ساخت منو با جاوا اسکریپت یکی از راههای ایجاد رابطهای کاربری تعاملی و پاسخگو است که کاربران را مشتاق به استفاده از وبسایت یا پلتفرم میکند. با ادغام یکپارچه جاوا اسکریپت، «HTML» و «CSS»، میتوان عملکرد وبسایتها را دگرگون کرد و به کاربران این امکان را داد که به آسانترین شکل ممکن وبسایت را پیمایش کنند. منوها یکی از مهمترین اجزای رابطهای کاربری در وبسایتها و وب اپلیکیشنها هستند که «تجربه کاربری» (User Experience یا به اختصار UX) را بسیار بهبود میبخشند. در این مطلب از «مجله فرادرس» قصد داریم صفر تا صد ایجاد منو در جاوا اسکریپت را بیان کنیم و در کنار آن ۱۰ منوی جذاب و کاربردی را همراه با منبع کد آنها ارائه کنیم، پس اگر دوست دارید ساخت منو با Javascript را یاد بگیرید و در کنار آن به نمونه منوهایی دسترسی داشته باشید که بتوانید با آنها تمرین کنید، تا آخر این مطلب با ما همراه باشید.
منوی جاوا اسکریپت چیست؟
منوی وبسایت جنبهای حیاتی از طراحی وب است که به عنوان رابط اصلی برای تعامل با کاربر عمل میکند. اگرچه منوی اولیه ساخته شده با HTML و CSS در بیشتر موارد پاسخگوی نیازهای وبسایت است اما یکپارچهسازی آنها با جاوا اسکریپت خلاقیت را به پروژه تزریق میکند و تجربه کلی کاربر را ارتقا میدهد. منوهای جاوا اسکریپت، چه به صورت نوارهای کناری، ناوبری هدر، یا منوهای موبایل و غیره، تعاملی پیشرفته را ارائه میدهند. استفاده از جاوا اسکریپت امکان کنترل دقیق روی رویدادهای کلیک را فراهم میکند و از محدودیتهای CSS بهتنهایی فراتر میرود. نتیجه ادغام جاوا اسکریپت با HTML و CSS در ساخت منو، نهتنها موجب ایجاد منویی جذاب میشود، بلکه عملکردهای ارزشمندی فراتر از قابلیتهای HTML و CSS را نیز به منوهای ساده اضافه میکند.
برای ساخت منو از چه فناوری هایی استفاده میشود؟
برای ساخت منوهای ساده میتوان از دو فناوری مهم وب یعنی HTML و CSS استفاده کرد ولی با این حال بسته به نیازهای پروژه و ترجیات طراح سایت و توسعهدهنده وب میتوان از فناوریهای دیگری مانند زبان برنامه نویسی جاوا اسکریپت نیز بهره برد که استفاده از این فناوری موجب عملگرا کردن و جذابیت بخشیدن به منوها میشود.
مزایای ساخت منو با جاوا اسکریپت چیست؟
ساخت منو با جاوا اسکریپت امکانات بسیاری را به وبسایتها اضافه میکند. این روش به توسعهدهندگان اجازه میدهد تا منوهای پویا و تعاملی را با استفاده از قابلیتهای جاوا اسکریپت ایجاد کنند. با استفاده از جاوا اسکریپت، میتوان به سرعت واکنشگرایی و تغییرات بر اساس اطلاعات دینامیک را فراهم کرد. همچنین، این روش امکانات فراوانی در اختیار کاربران قرار خواهد داد و تجربه کاربری را بهبود میبخشد.
ساخت منو با جاوا اسکریپت
در این بخش از مطلب به صورت قدم به قدم به ساخت منو با جاوا اسکریپت خواهیم پرداخت. منویی که قرار است در این مطلب به ساخت آن بپردازیم از نوع منوی کشویی یا همان منوی «Dropdown» است که در بیشتر وبسایتها مورد استفاده قرار میگیرد. این منو قرار است در ٣ قدم ساده برای کاربران تشریح شود که در ادامه این مطلب این ٣ مرحله آمده است.

مرحله ۱. علامت گذاری برای ایجاد منوی کشویی
قدم اول در ساخت منو با جاوا اسکریپت، مربوط به علامت گذاری منو است. برای شروع، آیکونهای موردنیاز را از «Boxicons» که نوعی کتابخانه آیکون رایگان بوده و استفاده از آن ساده است، وارد خواهیم کرد. برای این هدف باید تگ اسکریپت زیر را در هدر فایل HTML اضافه کرد:
<head>
   <link
     href="https://unpkg.com/[email protected]/css/boxicons.min.css"
     rel="stylesheet"
    />
 </head>
پس از واردکردن نمادها، یک div
کانتینری باید ایجاد شود تا هم دکمه و هم منوی کشویی را در بر بگیرد. همچنین در کانتینر باید نوعی عنصر دکمه ایجاد شود که کلاس و شناسه آن روی btn
تنظیم شده است. متن دکمه را میتوان سفارشی کرد و نوعی نماد پیکان برای جذابیت بصری به آن افزود که این کار با کد زیر امکانپذیر است:
<button class="btn" id="btn">
  Dropdown
  <i class="bx bx-chevron-down" id="arrow"></i>
</button>
حال نوبت به ادغام آیکونهای منوی کشویی خواهد رسید. مستقیم در زیر تگ دکمه، باید نوعی عنصر div
با کلاس و id تنظیم شده به Dropdown
ساخته شود. در این div
، باید برای هر آیتم منوی کشویی خاص، تگ A در HTML برای ایجاد لینک باید ایجاد شود و آیکونها و متن مربوطه را باید به آنها اختصاص داد. قطعه کد زیر برای انجام این کار است:
<div class="dropdown" id="dropdown">
<a href="#create">
<i class="bx bx-plus-circle"></i>
Create New
</a>
<a href="#draft">
<i class="bx bx-book"></i>
All Drafts
</a>
<a href="#move">
<i class="bx bx-folder"></i>
Move To
</a>
<a href="#profile">
<i class="bx bx-user"></i>
Profile Settings
</a>
<a href="#notification">
<i class="bx bx-bell"></i>
Notification
</a>
<a href="#settings">
<i class="bx bx-cog"></i>
Settings
</a>
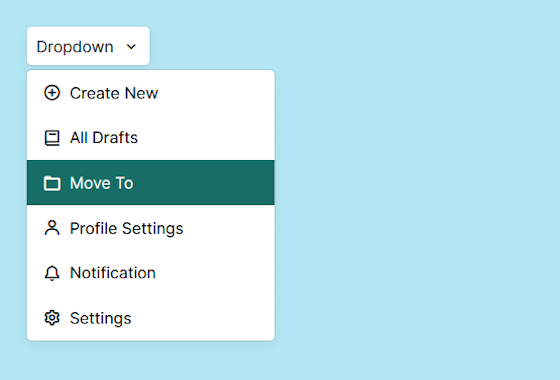
</div>خروجی کد زیر چیزی شبیه به تصویر زیر خواهد بود:

کار هنوز تکمیل نشده است و منویی که ایجاد میشود باید تکمیلتر شود که در ادامه این مطلب از ساخت منو با جاوا اسکریپت به آن پرداخته شده است.
مرحله ۲. استایل بخشیدن به منو با Css
کار استایل بخشیدن به منوها با تنظیم مجدد «حاشیه» (Margin) پیشفرض و «فضای اطراف محتوا» (Padding) برای هر عنصر صفحه و ایجاد مقادیر قابلاستفاده مجدد به وسیله متغیرها شروع خواهد شد. همچنین در این منو از خانواده فونت Inter
برای زیبایی استفاده میشود. همچنین سبکهای مورد استفاده برای عنصر بدنه، تنظیم حاشیه، رنگ پسزمینه، اندازه فونت و رنگ متن به صورت زیر هستند:
@import url(https://fonts.googleapis.com/css?family=Inter:100,200,300,regular,500,600,700,800,900);

* {
  margin: 0;
  padding: 0;
  box-sizing: border-box;
  font-family: "Inter", sans-serif;
  --shadow: rgba(0, 0, 0, 0.05) 0px 6px 10px 0px,
    rgba(0, 0, 0, 0.1) 0px 0px 0px 1px;
  --color: #166e67;
  --gap: 0.5rem;
  --radius: 5px;
}

body {
  margin: 2rem;
  background-color: #b3e6f4;
  font-size: 0.9rem;
  color: black;
}
کار بعدی در استایل بخشیدن به منو، شکل دادن به دکمه و کانتینر بازشو است که برای انجام این کار باید باید وظایف زیر را انجام داد:
- استفاده از متغیرهای تعریف شده برای مقادیر ثابت
- استفاده از box shadows
و رنگهای پسزمینه برای افزایش جذابیت بصری
- تنظیم padding
و «شعاع حاشیه» ( border-radius
) برای ظاهری صیقلی و جذاب
قطعه کد انجام این کار به صورت زیر است:
.btn {
  background-color: white;
  display: flex;
  align-items: center;
  justify-content: flex-start;
  column-gap: var(--gap);
  padding: 0.6rem;
  cursor: pointer;
  border-radius: var(--radius);
  border: none;
  box-shadow: var(--shadow);
  position: relative;
}

.bx {
  font-size: 1.1rem;
}

.dropdown {
  position: absolute;
  width: 250px;
  box-shadow: var(--shadow);
  border-radius: var(--radius);
  margin-top: 0.3rem;
  background: white;
}

.dropdown a {
  display: flex;
  align-items: center;
  column-gap: var(--gap);
  padding: 0.8rem 1rem;
  text-decoration: none;
  color: black;
}

.dropdown a:hover {
  background-color: var(--color);
  color: white;
}
از آنجایی که منوهای کشویی معمولاً عناصر را پوشش میدهند، دکمه از نظر استراتژیک به صورت نسبی قرار میگیرد، در حالی که منوی کشویی به صورت مطلق تنظیم میشود. این امر نزدیکی بین دو عنصر را تضمین میکند و عناصر از نظر بصری روی یکدیگر قرار میگیرند. این نوع چیدمان دکمه از نمایش یکپارچه صفحه محافظت کرده و تجربه کاربری یکپارچه را حفظ میکند. خروجی کارهای بالا تا این مرحله از ساخت منو با جاوا اسکریپت به صورت زیر است:
اکنونکه منوی کشویی ما تغییرات سبک خود را دریافت کرده است، هدف ما این خواهد بود که اطمینان حاصل کنیم که این منو فقط با کلیک روی دکمه ظاهر میشود، نه اینکه بلافاصله با باز شدن صفحه وب قابلمشاهده باشد. برای دستیابی به این هدف، از CSS برای مخفی کردن کشویی ابتدایی، استفاده خواهد شد. برای این کار باید از نوعی استراتژی برای پنهان کردن منوی کشویی استفاده شود. نمونهای زنده از این نوع استراتژی نحوه پیادهسازی منوهای کشویی سایت «GitHub» هستند که هم قابل مشاهده بوده هم انتقالهای متحرک را ارائه میدهند که تصویر آن به صورت زیر است:
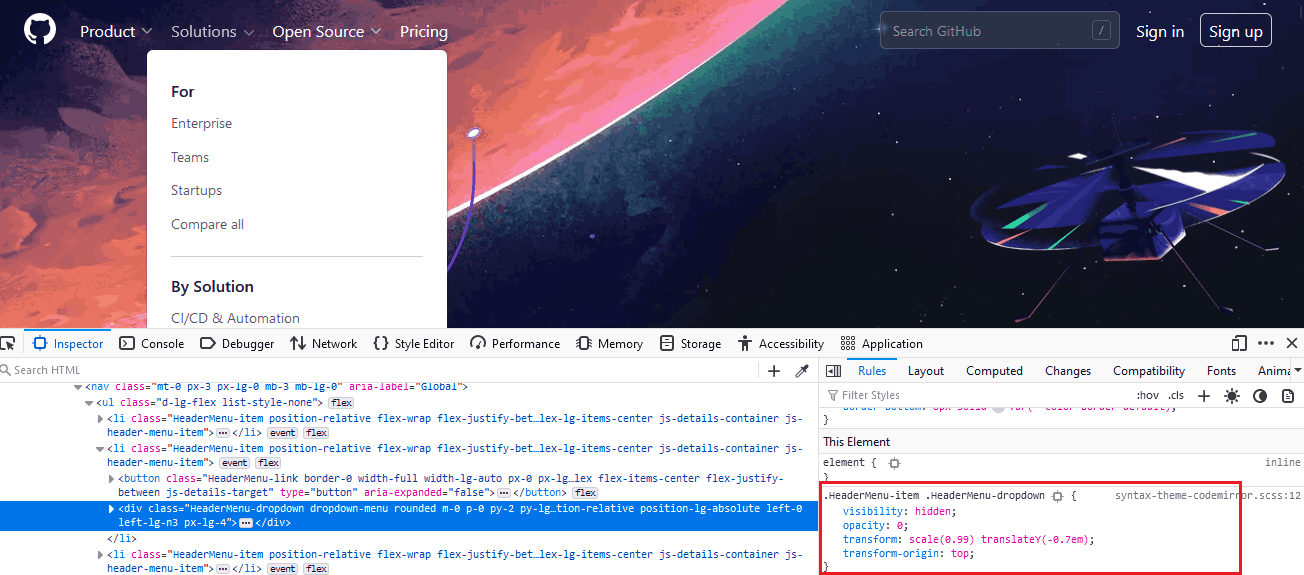
برای دستیابی به هدف بالا باید در کلاس dropdown
که قبلاً تعریف شده بود، نوعی ویژگی visibility
را روی hidden
و نوعی ویژگی opacity
را که روی صفر تنظیم شده است، معرفی کرد. این پیکربندی پنهانسازی اولیه منوی کشویی را تضمین میکند. همچنین برای تکمیل کردن کارهای دستیابی به این هدف باید کلاسی مجزا به نام show
ایجاد شود. این کلاس دارای ویژگی visibility
تنظیمشده روی visible
و ویژگی opacity
تنظیمشده روی ۱ است. این کلاس، هنگامی که با جاوا اسکریپت اعمال و ادغام شود، منوی کشویی را در معرض دید کاربر قرار میدهد. قطعه کد انجام این کار به صورت زیر است:
.dropdown {
  position: absolute;
  width: 250px;
  box-shadow: var(--shadow);
  border-radius: var(--radius);
  margin-top: 0.3rem;
  background: white;
  transition: all 0.1s cubic-bezier(0.16, 1, 0.5, 1);

  transform: translateY(0.5rem);
  visibility: hidden;
  opacity: 0;
}

.show {
  transform: translateY(0rem);
  visibility: visible;
  opacity: 1;
}

.arrow {
  transform: rotate(180deg);
  transition: 0.2s ease;
}
علاوه بر این در کد بالا، کلاسی به نام arrow
برای نماد فلش معرفی شده است که چرخش ۱۸۰ درجهای را با کلیک روی دکمه کشویی تسهیل میکند.
مرحله ۳. عملگرا کردن منوی کشویی با جاوا اسکریپت
این مرحله از ساخت منو با جاوا اسکریپت برای عملگرا کردن آن، با ذخیره عناصر مربوطه در متغیرها برای قابلیت استفاده مجدد شروع خواهد شد که کد انجام این کار به صورت زیر است:
const dropdownBtn = document.getElementById("btn");
const dropdownMenu = document.getElementById("dropdown");
const toggleArrow = document.getElementById("arrow");
متعاقباً، تابعی به نام «toggleDropdown»
باید ایجاد شود که مسئول تغییر کلاس show
در عنصر کشویی و چرخش فلش کشویی با کلیک روی دکمه است که کد آن به صورت زیر خواهد بود:
const toggleDropdown = function () {
  dropdownMenu.classList.toggle("show");
  toggleArrow.classList.toggle("arrow");
};
این تابع را باید با استفاده از «متد AddEventListener» در دکمه dropdown
فراخوانی کرد. این کار تضمین میکند که کلیک کردن روی دکمه عملکرد را فعال کرده، نمایشگر را مدیریت میکند و منوی کشویی را پنهان خواهد کرد که قطعه کد انجام این کار به صورت زیر است:
dropdownBtn.addEventListener("click", function (e) {
  e.stopPropagation();
  toggleDropdown();
});
همچنین در ساخت منوی بالا باید به گنجاندن stopPropagation()
در داخل تابع dropdown
توجه کرد. این متد از انتشار تابع عنصر دکمه به عنصر والد جلوگیری کرده و در نتیجه از اجرای دوباره تابع جلوگیری میکند. خروجی منوی جاوا اسکریپتی ما در این مرحله به صورت زیر است:
نحوه بستن منوی کشویی هنگام کلیک روی عنصر DOM
در ساخت منو با جاوا اسکریپت بستن منوهای کشویی معمولاً شامل چهار سناریوی زیر است:
- با کلیک بر روی دکمهای که آن را فعال میکند
- با کلیک روی هر یک از عناصر فرزند آن
- کلیک کردن در خارج از منو (روی بدنه)
- کلید جهتدار پایین صفحهکلید یا کلید اسکیپ (Escape)
در این مطلب، ما بر روی سه سناریو اول تمرکز خواهیم کرد که کار با انتخاب عنصر ریشه « html
» با استفاده از « document.documentElement
» شروع میشود. مانند قبل، تابع toggleDropdown()
باید وارد شود. با این حال، این بار، شرطی را برای بررسی اینکه آیا منوی کشویی شامل کلاس show
است یا خیر، باید معرفی کنیم. فقط زمانی که این شرط برآورده شود باید تابع بستن فعال شود که قطعه کد انجام این کار به صورت زیر است:
document.documentElement.addEventListener("click", function () {
  if (dropdownMenu.classList.contains("show")) {
    toggleDropdown();
  }
});
با اجرای شنونده رویداد بالا، کلیک کردن در خارج از منوی کشویی روی بدنه، آن را میبندد، تعامل کاربر را بهبود میبخشد و تجربه یکپارچه را تضمین میکند که خروجی نهایی به صورت زیر خواهد بود:
قطعه کد کامل ساخت منو با جاوا اسکریپت از نوع کشویی
قطعه کد کامل ساخت منوی کشویی با جاوا اسکریپت در زیر قرار داده شده که قطعه کد HTML این منوی جذاب به صورت زیر است:
<link href="https://unpkg.com/[email protected]/css/boxicons.min.css" rel="stylesheet" />

<div class="container">
  <button class="btn" id="btn">
    Dropdown
    <i class="bx bx-chevron-down" id="arrow"></i>
  </button>

  <div class="dropdown" id="dropdown">
    <a href="#create">
      <i class="bx bx-plus-circle"></i>
      Create New
    </a>
    <a href="#draft">
      <i class="bx bx-book"></i>
      All Drafts
    </a>
    <a href="#move">
      <i class="bx bx-folder"></i>
      Move To
    </a>
    <a href="#profile">
      <i class="bx bx-user"></i>
      Profile Settings
    </a>
    <a href="#notification">
      <i class="bx bx-bell"></i>
      Notification
    </a>
    <a href="#settings">
      <i class="bx bx-cog"></i>
      Settings
    </a>
  </div>
</div>
همچنین قطعه کد CSS کلی منوی ساخته شده به صورت زیر است:
@import url(https://fonts.googleapis.com/css?family=Inter:100,200,300,regular,500,600,700,800,900);

* {
  margin: 0;
  padding: 0;
  box-sizing: border-box;
  font-family: "Inter", sans-serif;
  --shadow: rgba(0, 0, 0, 0.05) 0px 6px 10px 0px,
    rgba(0, 0, 0, 0.1) 0px 0px 0px 1px;
  --color: #166e67;
  --gap: 0.5rem;
  --radius: 5px;
}

body {
  margin: 2rem;
  background-color: #b3e6f4;
  font-size: 0.9rem;
  color: black;
}

.btn {
  background-color: white;
  display: flex;
  align-items: center;
  justify-content: flex-start;
  column-gap: var(--gap);
  padding: 0.6rem;
  cursor: pointer;
  border-radius: var(--radius);
  border: none;
  box-shadow: var(--shadow);
  position: relative;
}

.bx {
  font-size: 1.1rem;
}

.dropdown {
  position: absolute;
  width: 250px;
  box-shadow: var(--shadow);
  border-radius: var(--radius);
  margin-top: 0.3rem;
  background: white;

  visibility: hidden;
  opacity: 0;
  transform: translateY(0.5rem);
  transition: all 0.1s cubic-bezier(0.16, 1, 0.5, 1);
}

.dropdown a {
  display: flex;
  align-items: center;
  column-gap: var(--gap);
  padding: 0.8rem 1rem;
  text-decoration: none;
  color: black;
}

.dropdown a:hover {
  background-color: var(--color);
  color: white;
}

.show {
  visibility: visible;
  opacity: 1;
  transform: translateY(0rem);
}

.arrow {
  transform: rotate(180deg);
  transition: 0.2s ease;
}
و در نهایت قطعه کد کامل جاوا اسکریپت منویی که در بالا ساختیم به صورت زیر است:
const dropdownBtn = document.getElementById("btn");
const dropdownMenu = document.getElementById("dropdown");
const toggleArrow = document.getElementById("arrow");

// Toggle dropdown function
const toggleDropdown = function () {
  dropdownMenu.classList.toggle("show");
  toggleArrow.classList.toggle("arrow");
};

// Toggle dropdown open/close when dropdown button is clicked
dropdownBtn.addEventListener("click", function (e) {
  e.stopPropagation();
  toggleDropdown();
});

// Close dropdown when dom element is clicked
document.documentElement.addEventListener("click", function () {
  if (dropdownMenu.classList.contains("show")) {
    toggleDropdown();
  }
});
۱۰ منوی نمونه ساخته شده با جاوا اسکریپت، HTML و CSS
در این بخش به عنوان نوعی تمرین جاوا اسکریپت ۱۰ نمونه منوی ساخته شده با جاوا اسکریپت، HTML و CSS ارائه خواهد شد. کاربران میتوانند از منوهای ارائه شده ایده گرفته و آن را در پروژههای طراحی سایت و توسعه وب خود به کار بگیرند.
۱. منوی جاوا اسکریپت شیب صفحه
قطعه کد HTML منوی جاوا اسکریپت شیب صفحه به صورت زیر است:
<div id="paper-back">
  <nav>
    <div class="close"></div>
    <a href="#">Home</a>
    <a href="#">About Us</a>
    <a href="#">Our Work</a>
    <a href="#">Contact</a>
  </nav>
</div>
<div id="paper-window">
  <div id="paper-front">
    <div class="hamburger"><span></span></div>
    <div id="container">
      <section>
        <h1>Page Tilt Menu Effect</h1>
        <p>Click the hamburger icon to see it in action</p>
      </section>
      <section></section>
      <section></section>
      <section></section>
    </div>
  </div>
</div>
همچنین قطعه کد CSS این پروژه جاوا اسکریپت به صورت زیر است:
body {
  font-family: "Architects Daughter", sans-serif;
}

#paper-back {
  width: 100%;
  height: 100vh;
  background-color: #243040;
  position: fixed;
  top: 0;
  left: 0;
  font-size: 33px;
}
#paper-back nav {
  padding: 120px 34px;
}
#paper-back nav a {
  display: block;
  margin-bottom: 25px;
  text-decoration: none;
  color: rgba(255, 255, 255, 0.7);
}

#paper-window {
  height: 100vh;
  width: 100vw;
  position: relative;
  overflow-x: hidden;
  overflow-y: scroll;
  z-index: 2;
}
#paper-window.tilt {
  overflow: hidden;
  pointer-events: none;
}
#paper-window.tilt #paper-front {
  transform: rotate(10deg) translateZ(0);
}

#paper-front {
  pointer-events: auto;
  position: relative;
  z-index: 3;
  background-color: white;
  box-shadow: 0 0 20px rgba(0, 0, 0, 0.7);
  transform-origin: center 70%;
  transition: all 0.3s ease;
}

#container section {
  height: 600px;
  text-align: center;
}
#container section:first-of-type {
  padding-top: 10vh;
}
#container section:first-of-type h1 {
  font-size: 45px;
}
#container section:first-of-type p {
  font-size: 25px;
}
@media (max-width: 600px) {
  #container section:first-of-type {
    padding-top: 15vh;
  }
  #container section:first-of-type h1 {
    font-size: 30px;
  }
  #container section:first-of-type p {
    font-size: 18px;
  }
}
#container section:nth-of-type(2n) {
  background-color: #edf1f5;
}

.hamburger {
  position: fixed;
  z-index: 4;
  top: 30px;
  left: 30px;
  width: 45px;
  height: 34px;
  cursor: pointer;
  -webkit-user-select: none;
     -moz-user-select: none;
      -ms-user-select: none;
          user-select: none;
}
.hamburger span {
  position: relative;
}
.hamburger span, .hamburger span:before, .hamburger span:after {
  display: block;
  width: 45px;
  height: 6px;
  background-color: #243040;
  border-radius: 2px;
}
.hamburger span:before, .hamburger span:after {
  content: "";
  position: absolute;
}
.hamburger span:before {
  bottom: -14px;
}
.hamburger span:after {
  bottom: -28px;
}

.close {
  position: fixed;
  top: 30px;
  left: 30px;
  width: 45px;
  height: 34px;
  cursor: pointer;
}
.close:before, .close:after {
  content: "";
  position: absolute;
  display: block;
  width: 45px;
  height: 6px;
  top: 50%;
  background-color: white;
  border-radius: 2px;
}
.close:before {
  transform: translateY(-50%) rotate(45deg);
}
.close:after {
  transform: translateY(-50%) rotate(-45deg);
}
قطعه کد جاوا اسکریپت این منو هم به صورت زیر است:
var paperMenu = {
  $window: $('#paper-window'),
  $paperFront: $('#paper-front'),
  $hamburger: $('.hamburger'),
  offset: 1800,
  pageHeight: $('#paper-front').outerHeight(),

  open: function() {
    this.$window.addClass('tilt');
    this.$hamburger.off('click');
    $('#container, .hamburger').on('click', this.close.bind(this));
    this.hamburgerFix(true);
    console.log('opening...');
  },
  close: function() {
    this.$window.removeClass('tilt');
    $('#container, .hamburger').off('click');
    this.$hamburger.on('click', this.open.bind(this));
    this.hamburgerFix(false);
    console.log('closing...');
  },
  updateTransformOrigin: function() {
    scrollTop = this.$window.scrollTop();
    equation = (scrollTop + this.offset) / this.pageHeight * 100;
    this.$paperFront.css('transform-origin', 'center ' + equation + '%');
  },
  //hamburger icon fix to keep its position
  hamburgerFix: function(opening) {
      if(opening) {
        $('.hamburger').css({
          position: 'absolute',
          top: this.$window.scrollTop() + 30 + 'px'
        });
      } else {
        setTimeout(function() {
          $('.hamburger').css({
            position: 'fixed',
            top: '30px'
          });
        }, 300);
      }
    },
  bindEvents: function() {
    this.$hamburger.on('click', this.open.bind(this));
    $('.close').on('click', this.close.bind(this));
    this.$window.on('scroll', this.updateTransformOrigin.bind(this));
  },
  init: function() {
    this.bindEvents();
    this.updateTransformOrigin();
  },
};

paperMenu.init()
خروجی منوی بالا به صورت زیر است:
در منوی ارائهشده بالا نوعی افکت شیب صفحه متمایز برای نشان دادن منوی سمت چپ استفاده میشود. با کلیک بر روی نماد همبرگر، منو به زیبایی فعال شده و باعث میشود کل بدنه اصلی با شیبی ظریف به سمت راست تغییر کند. با باز کردن منوی بالا نوعی انیمیشن یکپارچه باز میشود و تجربه بصری منحصربهفرد را ارائه میدهد. منو دارای دکمه بستن مخصوص به خود بوده و این در حالی است که نماد همبرگر بهراحتی از نمای بالای صفحه خارج میشود و به طراحی زیبا و کاربرپسند کمک میکند.
۲. نمونه منوی کشویی جاوا اسکریپت
این مثال هم از ساخت منو با جاوا اسکریپت همانند مثال اولی که مراحل ساخت آن را پیش رفتیم از نوع کشویی بوده که قطعه کد HTML آن به صورت زیر است:
<div class="flexDiv">
  <button class="sec_btn" onclick="openMulti();">Add to feature vector</button>
  <div class="selectWrapper">
    <div class="multiSelect" id="menu-0">
      <div class="bottomBorder">New feature vector</div>
      <div onclick="openMulti();">Vector_01</div>
      <div onclick="openMulti();">myVector</div>
      <div onclick="openMulti();">featureVector</div>
      <div class="topBorder iconDiv" onclick="nextMenu(event);">Other projects<i class="material-icons">arrow_right</i></div>
    </div>
    <div class="multiSelect" id="menu-1">
      <div class="bottomBorder iconDiv noSpace narrow placeholder"><i class="material-icons">search</i>Search</div>
      <div class="iconDiv justHover" onclick="nextMenu(event);">Project Example<i class="material-icons">arrow_right</i></div>
      <div class="iconDiv justHover" onclick="nextMenu(event);">David’s project<i class="material-icons">arrow_right</i></div>
      <div class="iconDiv justHover" onclick="nextMenu(event);">Project Idan<i class="material-icons">arrow_right</i></div>
      <div class="iconDiv justHover" onclick="nextMenu(event);">Manhattan<i class="material-icons">arrow_right</i></div>
      <div class="topBorder iconDiv noSpace" onclick="prevMenu(event);"><i class="material-icons">arrow_back</i>Back</div>
    </div>
    <div class="multiSelect" id="menu-2">
      <div class="bottomBorder titleDiv">Project Idan</div>
      <div onclick="openMulti();">Idan Vector</div>
      <div onclick="openMulti();">Testings</div>
      <div onclick="openMulti();">Features_120</div>
      <div onclick="openMulti();">Aggregators</div>
      <div id="menu-1" class="topBorder iconDiv noSpace" onclick="prevMenu(event);"><i class="material-icons">arrow_back</i>Back</div>
    </div>
    <div>
    </div>
همچنین قطعه کد CSS این مثال به صورت زیر است:
:root {
  --bgColor: #0fddaf;
  --txtColor: #ffffff;
  --borColor: rgba(0, 0, 0, 0);
  --sizeVar: 8px;
  --textPrimary: #4b4760;
  --textSecondary: #7f7989;
  --borderColor: #cccccc;
}
body {
  font-family: "Roboto", sans-serif;
  font-weight: 400;
  font-size: calc(var(--sizeVar) * 1.75);
}
.flexDiv {
  display: flex;
  flex-direction: column;
  align-items: flex-start;
  width: fit-content;
  margin: 32px;
}
.selectWrapper {
  width: 100%;
  position: relative;
  opacity: 0;
  pointer-events: none;
  transition: opacity 100ms linear 0s;
  filter: drop-shadow(0 6px 26px rgba(0, 0, 0, 0.24));
  padding-top: calc(var(--sizeVar) / 2);
}
.multiSelect {
  clip-path: polygon(0 0, 100% 0, 100% 100%, 0% 100%);
  border: 1px solid var(--borderColor);
  box-sizing: border-box;
  border-radius: calc(var(--sizeVar) / 2);
  position: absolute;
  width: auto;
  left: 0;
  right: 0;
  overflow: hidden;
  background: #ffffff;
  transition: transform 300ms ease-in-out 0s, clip-path 300ms ease-in-out 0s;
}
.multiSelect div {
  color: var(--textPrimary);
  padding: 16px;
  width: auto;
  cursor: pointer;
}
.multiSelect div:hover {
  background-color: #f6f6f6;
}
.bottomBorder {
  border-bottom: 1px solid var(--borderColor);
}
.topBorder {
  border-top: 1px solid var(--borderColor);
}
.iconDiv {
  display: flex;
  align-items: center;
  justify-content: space-between;
}
.noSpace {
  justify-content: flex-start;
  gap: 6px;
}
.titleDiv {
  pointer-events: none;
  font-weight: 700;
}
.justHover i {
  opacity: 0;
}
.justHover:hover i {
  opacity: 1;
}
.multiSelect .placeholder {
  color: var(--textSecondary);
  font-style: italic;
}
.multiSelect .narrow {
  padding-top: 10px;
  padding-bottom: 10px;
}
.multiSelect i {
  color: var(--textSecondary);
}
.multiSelect {
  transform: translateX(100%);
  clip-path: polygon(0 0, 0 0, 0 100%, 0% 100%);
}
.multiSelect:nth-of-type(1) {
  transform: translateX(0);
  clip-path: polygon(0 0, 100% 0, 100% 100%, 0% 100%);
}
.sec_btn {
  --bgColor: #869cff;
}
button {
  font-family: "Roboto", sans-serif;
  font-size: calc(var(--sizeVar) * 1.75);
  font-weight: 500;
  border: none;
  outline: none;
  padding: var(--sizeVar) calc(var(--sizeVar) * 2);
  border-radius: calc(var(--sizeVar) / 2);
  cursor: pointer;
  background-color: var(--bgColor);
  color: var(--txtColor);
  box-shadow: 0 0 0 1px var(--borColor) inset;
}
button:focus {
  --borColor: rgba(0, 0, 0, 0.4);
}
button:hover {
  --bgColor: #1fcc9e;
}
.sec_btn:hover {
  --bgColor: #6279e7;
}
.tri_btn:hover {
  --bgColor: #f8f7f8;
}
button:active {
  --bgColor: #1db284;
}
.sec_btn:active {
  --bgColor: #5468c7;
}
.tri_btn:active {
  --bgColor: #e7e7e7;
}
قطعه کد جاوا اسکریپت کد بالا هم به صورت زیر است:
function openMulti() {
  if (document.querySelector(".selectWrapper").style.pointerEvents == "all") {
    document.querySelector(".selectWrapper").style.opacity = 0;
    document.querySelector(".selectWrapper").style.pointerEvents = "none";
    resetAllMenus();
  } else {
    document.querySelector(".selectWrapper").style.opacity = 1;
    document.querySelector(".selectWrapper").style.pointerEvents = "all";
  }
}
function nextMenu(e) {
  menuIndex = eval(event.target.parentNode.id.slice(-1));
  document.querySelectorAll(".multiSelect")[menuIndex].style.transform =
    "translateX(-100%)";
  // document.querySelectorAll(".multiSelect")[menuIndex].style.clipPath = "polygon(0 0, 0 0, 0 100%, 0% 100%)";
  document.querySelectorAll(".multiSelect")[menuIndex].style.clipPath =
    "polygon(100% 0, 100% 0, 100% 100%, 100% 100%)";
  document.querySelectorAll(".multiSelect")[menuIndex + 1].style.transform =
    "translateX(0)";
  document.querySelectorAll(".multiSelect")[menuIndex + 1].style.clipPath =
    "polygon(0 0, 100% 0, 100% 100%, 0% 100%)";
}
function prevMenu(e) {
  menuIndex = eval(event.target.parentNode.id.slice(-1));
  document.querySelectorAll(".multiSelect")[menuIndex].style.transform =
    "translateX(100%)";
  document.querySelectorAll(".multiSelect")[menuIndex].style.clipPath =
    "polygon(0 0, 0 0, 0 100%, 0% 100%)";
  document.querySelectorAll(".multiSelect")[menuIndex - 1].style.transform =
    "translateX(0)";
  document.querySelectorAll(".multiSelect")[menuIndex - 1].style.clipPath =
    "polygon(0 0, 100% 0, 100% 100%, 0% 100%)";
}
function resetAllMenus() {
  setTimeout(function () {
    var x = document.getElementsByClassName("multiSelect");
    var i;
    for (i = 1; i < x.length; i++) {
      x[i].style.transform = "translateX(100%)";
      x[i].style.clipPath = "polygon(0 0, 0 0, 0 100%, 0% 100%)";
    }
    document.querySelectorAll(".multiSelect")[0].style.transform =
      "translateX(0)";
    document.querySelectorAll(".multiSelect")[0].style.clipPath =
      "polygon(0 0, 100% 0, 100% 100%, 0% 100%)";
  }, 300);
}
خروجی کدهای بالا برای ساخت منوی کشویی به صورت زیر است:
منوی کشویی جاوا اسکریپت ساختهشده بالا بهعنوان نوعی برنامه افزودنی همهکاره و قابل انطباق برای هر رابط کاربری و طراحی عمل میکند. برخلاف منوهای کشویی معمولی با یک سطح، این منو انعطافپذیری چندین لایه را ارائه میدهد. کاربران میتوانند یک زیرمجموعه را انتخاب کرده و از گزینههای منوی اضافی بهره ببرند. علاوه بر این، گزینه راحت «بازگشت» (Back)، در منوی بالا پیمایش یکپارچه را به سطح قبلی تسهیل میکند. همچنین پیادهسازی CSS در منوی بالا شامل متغیرهایی است که بهراحتی قابلتغییر هستند که این کار امکان سفارشیسازی بدون زحمت استایل منو را برای مطابقت با ترجیحات طراحی خاص فراهم میکند.
۳. منوی متحرک زاویه دار
منوی بعدی، منوی متحرک زاویهداری است. قطعه کد HTML این منوی جذابه به صورت زیر خواهد بود:
<nav class="navigation-menu js-nav-menu">
  <div class="navigation-menu__toggle js-nav-menu-toggle">
    <span class="navigation-menu__bars"></span>
  </div>
  <ul class="menu-list">
    <li class="menu-list__item">Menu Item 1</li>
    <li class="menu-list__item">Menu Item 2</li>
    <li class="menu-list__item">Menu Item 3</li>
    <li class="menu-list__item">Menu Item 4</li>
    <li class="menu-list__item">Menu Item 5</li>
  </ul>
</nav>
همچنین قطعه کد CSS آن به صورت زیر است:
@import url(https://fonts.googleapis.com/css?family=Lato:400);

$body-color: #fff;
$menu-background-color: #4E567E;
$menu-icons-color: #fff;
$font-stack: 'Lato', sans-serif;

* {
  box-sizing: border-box;
}

html {
  font-size: 62.5%;
}

body {
  background: url(https://images.unsplash.com/photo-1444927714506-8492d94b4e3d?ixlib=rb-0.3.5&q=80&fm=jpg&crop=entropy&s=067f0b097deff88a789e125210406ffe) center center no-repeat;
  background-size: cover;
  color: $body-color;
  font-family: $font-stack;
  font-size: 2.4rem;
  height: 100vh;
}

%bars {
  cursor: pointer;
    border-radius: 1px;
    height: 2px;
    width: 25px;
    background: $menu-icons-color;
    position: absolute;
    left: 0;
    top: 50%;
    display: block;
    transition: all .3s;
}

.navigation-menu {
  background-color: transparent;
  height: 100%;
  position: fixed;
  width: 600px;
  transform: translateX(-100%);
  transition: transform .3s .3s;

  &::before {
    background: $menu-background-color;
    content: '';
    height: 400%;
    left: 50%;
    position: absolute;
    top: 0;
    transform: translate(-50%, -50%) rotate(40deg);
    width: 100%;
    z-index: 0;
  }

  &--open {
    transform: translateX(0);

    & .navigation-menu__bars {
      background-color: transparent;

      &::before,
      &::after {
        top: 0;
      }

      &::before {
        transform: rotate(45deg);
      }

      &::after {
        transform: rotate(-45deg);
      }
    }

    .menu-list__item {
      opacity: 1;
    }

    $menu-delay: 1s;
    @for $i from 1 through 12 {
      .menu-list__item:nth-child(#{$i}) {
        transition-delay: $menu-delay;
      }
      $menu-delay: $menu-delay + .25s;
    }
  }

  &__toggle {
    cursor: pointer;
    height: 30px;
    position: absolute;
    right: -40px;
    top: 5px;
    width: 30px;
  }

  &__bars {
    @extend %bars;

    &::before,
    &::after {
      @extend %bars;
      content: '';
    }

    &::before {
      left: 0;
      top: -8px;
    }

    &::after {
      left: 0;
      top: 8px;
    }
  }
}

.menu-list {
  padding: 60px 20px;
  position: relative;
  z-index: 10;

  &__item {
    margin: 40px 0;
    opacity: 0;
    transition: opacity .5s .5s;
  }
}

@media only screen and (max-width: 700px) {
  .navigation-menu {
    min-width: 240px;
    width: 80%;

    &::before {
      width: 110%;
    }
  }
}

@media only screen and (max-width: 480px) {
  .navigation-menu {
    background-color: $menu-background-color;
    min-width: 240px;
    width: 80%;

    &::before {
      transform: translate(-50%, -50%) rotate(45deg)
    }
  }
}
همچنین قطعه کد جاوا اسکریپت این منو به صورت زیر است:
(function($) {
  $('.js-nav-menu-toggle').on('click', function() {
    $(this).parents('.navigation-menu').toggleClass('navigation-menu--open');
  });

  $('html').on('click', function(e) {
    if(!$(e.target).closest('.js-nav-menu').length &&
      ($('.js-nav-menu').hasClass('navigation-menu--open'))) {
        $('.js-nav-menu').removeClass('navigation-menu--open');
    }
  });
})(jQuery);
خروجی منوی ساخته شده بالا به صورت زیر است:
با تغییر رنگ منو، سبک فونت و رنگهای پسزمینه با استفاده از CSS، بدون زحمت، منو را میتوان با سایت و برندهای مختلف هماهنگ کرد. متغیرهای ارائه شده با قابلیت تغییر آسان به کاربر این امکان را میدهد تا زیبایی منو را شخصیسازی کند. همچنین ساختار HTML منوی بالا ساده و قابلگسترش است و امکان افزودن آسان ویژگیها و امکانات دیگر را فراهم میکند. منوی فوق با استفاده از جاوا اسکریپت، با انیمیشنهای روان و کلاس پویا که با رویدادهای کلیک تغییر میکنند، جذابیت خاصی به طراحی داده و تعامل کاربر و جذابیت بصری را افزایش میدهد.
۴. منوی ناوبری هدر متحرک
در این بخش از ساخت منو با جاوا اسکریپت به بررسی نمونه منوی ناوبری با هدر متحرک میپردازیم که قطعه کد HTML آن به صورت زیر است:
<div class="menu">
  <div class="container">
    <div class="toggle"></div>
  </div><span class="hidden"><a href="#">Home </a></span><span class="hidden"><a href="#">About </a></span><span class="hidden"><a href="#">Info</a></span><span class="hidden"><a href="#">Contact</a></span>
</div>
همچنین قطعه کد این مثال به صورت زیر است:
span:nth-of-type(4) {
  transition-delay: 0.7s;
}
span.hidden {
  width: 0;
  visibility: hidden;
  opacity: 0;
  transform: rotateY(90deg);
}
span.hidden:nth-of-type(1) {
  transition-delay: 0.3s;
}
span.hidden:nth-of-type(2) {
  transition-delay: 0.2s;
}
span.hidden:nth-of-type(3) {
  transition-delay: 0.1s;
}
span.hidden:nth-of-type(4) {
  transition-delay: 0s;
}
span a {
  color: black;
  text-decoration: none;
  font-size: 16.3636363636px;
  transition: 0.3s;
}
span a:hover {
  color: #1D90F5;
}

.container {
  position: absolute;
  top: 22.5px;
  right: calc(100% - 73.125px);
  height: 42.75px;
  width: 58.5px;
  transition: 1s;
}
.container.close {
  right: 0;
}

.toggle {
  position: relative;
  height: 42.75px;
  width: 58.5px;
  cursor: pointer;
}
.toggle:after, .toggle:before {
  content: "";
  background: #1D90F5;
  width: 36px;
  height: 4.5px;
  margin: auto;
  position: absolute;
  top: 0;
  bottom: 0;
  right: 0;
  left: 0;
  transition: 1.3s cubic-bezier(0.53, 0, 0.15, 1.3);
}
.toggle:before {
  top: -30%;
}
.toggle:after {
  top: 30%;
}
.toggle.close:before {
  transform: rotate(-225deg);
  top: 0;
}
.toggle.close:after {
  transform: rotate(225deg);
  top: 0;
}
قطعه کد جاوا اسکریپت این مثال هم به صورت زیر است:
$('.toggle').on('click', function() {
  $('.menu').toggleClass('expanded');
  $('span').toggleClass('hidden');
  $('.container , .toggle').toggleClass('close');
});
خروجی مثال بالا به صورت زیر است:
منوهای جاوا اسکریپت به اشکال مختلفی ارائه میشوند و منوی بالا برای استفاده از تلفن همراه طراحی شده است که تطبیقپذیری آن به آن اجازه میدهد تا به طور یکپارچه به منوی ناوبری هدر اصلی تبدیل شود. کاربران میتوانند این طراحی را در وبسایت خود پیاده کرده و وبسایت خود را جذاب و کاربرپسند کنند. همچنین منوی قابل تطبیق بالا به کاربر این امکان را میدهد تا ناوبری وبسایت خود را مطابق با طراحی منحصربهفرد و نیازهای عملکردی خود شکل دهد.
۵. منوی حبابی در جاوا اسکریپت
این مثال از ساخت منو با جاوا اسکریپت از نوع منوی حبابی بوده که بسیار منوی جذابی است.
قطعه کد HTML این مثال به صورت زیر است:
<body>

<nav id="nav">
  <div class="bubble_all" id="icon">
    <button class="va_menu_icon va_menu_icon-X">
      <span></span>
    </button>

  </div>
  <div class="bubble" id="one">
    <svg xmlns="http://www.w3.org/2000/svg" xmlns:xlink="http://www.w3.org/1999/xlink" version="1.1" id="Capa_1" x="0px" y="0px" viewBox="0 0 492.014 492.014" style="enable-background:new 0 0 492.014 492.014;" xml:space="preserve" width="40px" height="40px">
<g id="XMLID_144_">
  <path id="XMLID_151_" d="M339.277,459.566H34.922V32.446h304.354v105.873l32.446-32.447V16.223C371.723,7.264,364.458,0,355.5,0   H18.699C9.739,0,2.473,7.264,2.473,16.223v459.568c0,8.959,7.265,16.223,16.226,16.223H355.5c8.958,0,16.223-7.264,16.223-16.223   V297.268l-32.446,32.447V459.566z" fill="#111111"/>
  <path id="XMLID_150_" d="M291.446,71.359H82.751c-6.843,0-12.396,5.553-12.396,12.398c0,6.844,5.553,12.397,12.396,12.397h208.694   c6.845,0,12.397-5.553,12.397-12.397C303.843,76.912,298.29,71.359,291.446,71.359z" fill="#111111"/>
  <path id="XMLID_149_" d="M303.843,149.876c0-6.844-5.553-12.398-12.397-12.398H82.751c-6.843,0-12.396,5.554-12.396,12.398   c0,6.845,5.553,12.398,12.396,12.398h208.694C298.29,162.274,303.843,156.722,303.843,149.876z" fill="#111111"/>
  <path id="XMLID_148_" d="M274.004,203.6H82.751c-6.843,0-12.396,5.554-12.396,12.398c0,6.845,5.553,12.397,12.396,12.397h166.457   L274.004,203.6z" fill="#111111"/>
  <path id="XMLID_147_" d="M204.655,285.79c1.678-5.618,4.076-11.001,6.997-16.07h-128.9c-6.843,0-12.396,5.553-12.396,12.398   c0,6.844,5.553,12.398,12.396,12.398h119.304L204.655,285.79z" fill="#111111"/>
  <path id="XMLID_146_" d="M82.751,335.842c-6.843,0-12.396,5.553-12.396,12.398c0,6.843,5.553,12.397,12.396,12.397h108.9   c-3.213-7.796-4.044-16.409-1.775-24.795H82.751z" fill="#111111"/>
  <path id="XMLID_145_" d="M479.403,93.903c-6.496-6.499-15.304-10.146-24.48-10.146c-9.176,0-17.982,3.647-24.471,10.138   L247.036,277.316c-5.005,5.003-8.676,11.162-10.703,17.942l-14.616,48.994c-0.622,2.074-0.057,4.318,1.477,5.852   c1.122,1.123,2.624,1.727,4.164,1.727c0.558,0,1.13-0.08,1.688-0.249l48.991-14.618c6.782-2.026,12.941-5.699,17.943-10.702   l183.422-183.414c6.489-6.49,10.138-15.295,10.138-24.472C489.54,109.197,485.892,100.392,479.403,93.903z" fill="#111111"/>
</g>
<g>
</g>
<g>
</g>
<g>
</g>
<g>
</g>
<g>
</g>
<g>
</g>
<g>
</g>
<g>
</g>
<g>
</g>
<g>
</g>
<g>
</g>
<g>
</g>
<g>
</g>
<g>
</g>
<g>
</g>
</svg>
    <h3>About</h3>
  </div>
  <div class="bubble" id="two">
    <svg xmlns="http://www.w3.org/2000/svg" xmlns:xlink="http://www.w3.org/1999/xlink" version="1.1" viewBox="0 0 512 512" enable-background="new 0 0 512 512" width="40px" height="40px">
      <g>
        <g>
          <path d="M11,501h117.8V301.9H11V501z M31.9,321.7H108v158.5H31.9V321.7z" fill="#111111"/>
          <path d="M197.6,501h116.8h1V220.6H197.6V501z M217.4,240.4h76.1v239.8h-76.1V240.4z" fill="#111111"/>
          <path d="M383.2,11v490H501V11H383.2z M480.1,480.1H404V31.9h76.1V480.1z" fill="#111111"/>
        </g>
      </g>
    </svg>
    <h3>Skills</h3>
  </div>
  <div class="bubble" id="three">
    <?xml version="1.0" encoding="iso-8859-1"?>
    <!-- Generator: Adobe Illustrator 19.0.0, SVG Export Plug-In . SVG Version: 6.00 Build 0)  -->
    <svg xmlns="http://www.w3.org/2000/svg" xmlns:xlink="http://www.w3.org/1999/xlink" version="1.1" id="Layer_1" x="0px" y="0px" viewBox="0 0 307.116 307.116" style="enable-background:new 0 0 307.116 307.116;" xml:space="preserve" width="40px" height="40px">
<g>
  <g>
    <path d="M299.257,35.934c2.761,0,5-2.238,5-5V5c0-2.762-2.239-5-5-5H7.859c-2.761,0-5,2.238-5,5v25.934c0,2.762,2.239,5,5,5h9.451    v155.804H7.859c-2.761,0-5,2.238-5,5v25.934c0,2.762,2.239,5,5,5h140.699v15.399l-54.567,55.541    c-1.935,1.97-1.907,5.136,0.063,7.07c1.969,1.938,5.136,1.907,7.071-0.063l19.347-19.692h66.172l19.347,19.692    c1.934,1.97,5.102,1.998,7.071,0.063c1.97-1.935,1.998-5.101,0.063-7.07l-54.567-55.541v-15.399h140.699c2.761,0,5-2.238,5-5    v-25.934c0-2.762-2.239-5-5-5h-9.451V35.934H299.257z M176.819,275.927h-46.523l23.261-23.677L176.819,275.927z M294.257,201.737    v15.934H12.859v-15.934h9.451h262.496H294.257z M27.31,191.737V35.934h252.496v155.803H27.31z M12.859,25.934V10h281.398v15.934    C279.275,25.934,26.773,25.934,12.859,25.934z" fill="#111111"/>
  </g>
</g>
<g>
</g>
<g>
</g>
<g>
</g>
<g>
</g>
<g>
</g>
<g>
</g>
<g>
</g>
<g>
</g>
<g>
</g>
<g>
</g>
<g>
</g>
<g>
</g>
<g>
</g>
<g>
</g>
<g>
</g>
</svg>

    <h3>Projects</h3>
  </div>
  <div class="bubble" id="four">
    <?xml version="1.0" encoding="iso-8859-1"?>
    <!-- Generator: Adobe Illustrator 19.0.0, SVG Export Plug-In . SVG Version: 6.00 Build 0)  -->
    <svg xmlns="http://www.w3.org/2000/svg" xmlns:xlink="http://www.w3.org/1999/xlink" version="1.1" id="Layer_1" x="0px" y="0px" viewBox="0 0 484.849 484.849" style="enable-background:new 0 0 484.849 484.849;" xml:space="preserve" width="40px" height="40px">
<g>
  <path d="M262.797,274.552c30.206,30.206,63.252,49.446,81.428,47.771c13.579-1.252,30.7-19.862,30.7-19.862l-38.945-38.944   l-15.532,15.532L258.3,216.901l15.532-15.532l-38.945-38.944c0,0-18.611,17.12-19.862,30.699   C213.351,211.3,232.59,244.345,262.797,274.552z" fill="#111111"/>
  <path d="M49.924,0v113.712h-22.5v30h22.5v83.712h-25v30h25v83.712h-25v30h25v113.712h410V0H49.924z M79.924,371.136h25v-30h-25   v-83.712h25v-30h-25v-83.712h25v-30h-25V30h50v424.849h-50V371.136z M429.924,454.849h-270V30h270V454.849z" fill="#111111"/>
</g>
<g>
</g>
<g>
</g>
<g>
</g>
<g>
</g>
<g>
</g>
<g>
</g>
<g>
</g>
<g>
</g>
<g>
</g>
<g>
</g>
<g>
</g>
<g>
</g>
<g>
</g>
<g>
</g>
<g>
</g>
</svg>

    <h3>Contact</h3>
  </div>
</nav>

<section class="start">
  <div class="content">
    <h1>PenFolio</h1>
  </div>
</section>
<section class="first">
  <div class="content">
    <h2>About</h2>
    <p>Lorem ipsum dolor sit amet...</p>
  </div>
</section>
<section class="second">
  <div class="content">
    <h2>Skills</h2>
    <p>Lorem ipsum dolor sit amet...</p>
  </div>
</section>
<section class="third">
  <div class="content">
    <h2>Projects</h2>
    <p>Lorem ipsum dolor sit amet..</p>
  </div>
</section>
<section class="fourth">
  <div class="content">
    <h2>Contact</h2>
    <p>Lorem ipsum dolor sit amet...</p>
  </div>
</section>

</body>
قطعه کد CSS منوی حبابی مد نظر هم به صورت زیر است:
@import url(https://fonts.googleapis.com/css?family=Roboto:400,300,700);
* {
    margin: 0;
    padding: 0;
}
body {
    overflow: hidden;
}
::-webkit-scrollbar {
    display: none;
}
.va_menu_icon {
    display: block;
    position: absolute;
    overflow: hidden;
    margin: 0;
    padding: 0;
    width: 45px;
    height: 45px;
    font-size: 0;
    text-indent: -9999px;
    appearance: none;
    box-shadow: none;
    border-radius: none;
    border: none;
    cursor: pointer;
    transition: background 0.3s;
    top: 57%;
    left: 50%;
    transform: translate(-50%, -50%);
    background-color: transparent;
    z-index: 99;
}

.va_menu_icon:focus {
    outline: none;
}

.va_menu_icon span {
    display: block;
    position: absolute;
    top: 15px;
    left: 0;
    right: 0;
    height: 7px;
    background: #fff;
}

.va_menu_icon span:before, .va_menu_icon span:after {
    position: absolute;
    display: block;
    left: 0;
    width: 100%;
    height: 7px;
    background-color: #fff;
    content: "";
}

.va_menu_icon span:before {
    top: -14px;
}

.va_menu_icon span:after {
    bottom: -14px;
}

.va_menu_icon-X span {
    transition: background 0s 0.3s;
}

.va_menu_icon-X span:before, .va_menu_icon-X span:after {
    transition-duration: 0.3s, 0.3s;
    transition-delay: 0.3s, 0s;
}

.va_menu_icon-X span:before {
    transition-property: top, transform;
}

.va_menu_icon-X span:after {
    transition-property: bottom, transform;
}

.va_menu_icon-X.is-active span {
    background: none;
}

.va_menu_icon-X.is-active span:before {
    top: 0;
    transform: rotate(45deg);
}

.va_menu_icon-X.is-active span:after {
    bottom: 0;
    transform: rotate(-45deg);
}

.va_menu_icon-X.is-active span:before, .va_menu_icon-X.is-active span:after {
    transition-delay: 0s, 0.3s;
}
nav {
    position: absolute;
    top: 100px;
    left: 100px;
    transform: translate(-50%, -50%);
    border-radius: 50%;
    width: 75px;
    height: 75px;
    z-index: 4;
}
.bubble_all {
    position: absolute;
    top: 50%;
    left: 50%;
    transform: translate(-50%, -50%);
    background-color: #FD898A;
    border-radius: 50%;
    width: 75px;
    height: 75px;
    z-index: 4;
}
#one, #two, #three, #four {
    position: absolute;
    top: 50%;
    left: 50%;
    transform: translate(-50%, -50%);
    border-radius: 50%;
    width: 65px;
    height: 65px;
    z-index: 3;
    box-shadow: 0 0 20px -5px #111;
    text-align: center;
}
.bubble svg:hover ~ h3 {
     opacity: 1;
}
.bubble h3 {
    opacity: 0;
    transition: all 400ms;
    -webkit-transition: all 600ms;
}
#one {
    background-color: #FDEECF;
}
#one svg {
    width: 40px;
    margin-top: 12px;
}
#one>h3 {
    position: absolute;
    font-family: 'Roboto', sans-serif;
    font-size: 16px;
    color: #111111;
    top: 50%;
    left: 75px;
    transform: translateY(-50%);
}
#two {
    background-color: #FDD0BC;
}
#two svg {
    width: 40px;
    margin-top: 12px;
}
#two>h3 {
    position: absolute;
    font-family: 'Roboto', sans-serif;
    font-size: 16px;
    color: #111111;
    top: 75px;
    left: 50%;
    transform: translateX(-50%);
}
#three {
    background-color: #EDB4B5;
}
#three svg {
    width: 40px;
    margin-top: 14px;
}
#three>h3 {
    position: absolute;
    font-family: 'Roboto', sans-serif;
    font-size: 16px;
    color: #111111;
    top: 50%;
    left: -75px;
    transform: translateY(-50%);
}
#four {
    background-color: #CB86A0;
}
#four svg {
    width: 40px;
    margin-top: 12px;
}
#four>h3 {
    position: absolute;
    font-family: 'Roboto', sans-serif;
    font-size: 16px;
    color: #111111;
    top: -30px;
    left: 50%;
    transform: translateX(-50%);
}
section {
    width: 100vw;
    height: 100vh;
    position: absolute;
}
.start {
    top: 0;
    left: 0;
    background-color: #445369;
    text-align: center;
}
.first {
    left: 100vw;
    top: 0;
    background-color: #FDEECF;
}
.second {
    left: 0;
    top: 100vh;
    background-color: #FDD0BC;
}
.third {
    left: -100vw;
    top: 0;
    background-color: #EDB4B5;
}
.fourth {
    left: 0;
    top: -100vh;
    background-color: #CB86A0;
}
section:first-child.content {
    width: 100%;
    height: 100vh;
    opacity: 1;
}
.content {
    width: 70%;
    height: 100vh;
    opacity: 1;
    margin: 0 auto;
    overflow-y: scroll;
}
.start h1 {
    font-family: 'Roboto', sans-serif;
    font-size: 40px;
    line-height: 100vh;
    color: #111111;
}
h2 {
    font-family: 'Roboto', sans-serif;
    font-size: 40px;
    color: #111111;
    margin-top: 200px;
}
.content p {
    font-family: 'Roboto', sans-serif;
    font-size: 20px;
    line-height: 1.3;
    color: #111111;
    margin: 50px 10px;
}
و در نهایت قطعه کد جاوا اسکریپت آن به صورت زیر است:
var isTop = true;
  var menuIsOpen = false;

  var menuIcon = $('.va_menu_icon');

  var one = $('#one');
  var two = $('#two');
  var three = $('#three');
  var four = $('#four');

  menuIcon.click(function() {
    if (isTop === true) {
      $('#nav').animate({ top: '50%', left: '50%' }, 400);
      $('.content').animate({ opacity: '0' }, 700);
      showBubbles();
      isTop = false;
    } else {
      if (menuIsOpen === false) {
        showBubbles();
      } else {
        hideBubbles();
      }
    }
  });

  function showBubbles() {
    menuIcon.addClass('is-active');

    one.animate({ opacity: '1' }, 10);
    two.animate({ opacity: '1' }, 10);
    three.animate({ opacity: '1' }, 10);
    four.animate({ opacity: '1' }, 10);

    one.animate({ left: '140px' }, 110);
    two.animate({ top: '140px' }, 200);
    one.animate({ left: '130px' }, 100);
    three.animate({ left: '-65px' }, 300);
    two.animate({ top: '130px' }, 210);
    four.animate({ top: '-65px' }, 400);
    three.animate({ left: '-55px' }, 310);
    four.animate({ top: '-55px' }, 400);

    menuIsOpen = true;
  }

  function hideBubbles() {
    menuIcon.removeClass('is-active');

    setTimeout(function() {
      $('#nav').animate({ top: '100px', left: '100px' }, 400);
      $('.content').animate({ opacity: '1' }, 900);
    }, 500);
    four.animate({ top: '-65px' }, 400);
    three.animate({ left: '-65px' }, 300);
    four.animate({ top: '50%' }, 400);
    two.animate({ top: '140px' }, 200);
    three.animate({ left: '50%' }, 310);
    one.animate({ left: '140px' }, 110);
    two.animate({ top: '50%' }, 200);
    one.animate({ left: '50%' }, 110);

    menuIsOpen = false;
    isTop = true
  }

  $('.bubble').click(function() {
    menuIcon.removeClass('is-active');
    hideBubbles();
    setTimeout(function() {
      $('#nav').animate({ top: '100px', left: '100px' }, 400);
    }, 500);
    isTop = true;
  });

  one.click(function() {
    moveToPage('0', '100vw', '-100vw', '-100vw');
  });

  two.click(function() {
    moveToPage('100vw', '0', '-100vw', '-100vw');
  });

  three.click(function() {
    moveToPage('100vw', '100vw', '0', '-100vw');
  });

  four.click(function() {
    moveToPage('100vw', '100vw', '-100vw', '0');
  });

  function moveToPage(firstLeft, secondTop, thirdLeft, fourthTop) {
    $('.first').animate({ left: firstLeft }, 400);
    $('.second').animate({ top: secondTop }, 400);
    $('.third').animate({ left: thirdLeft }, 400);
    $('.fourth').animate({ top: fourthTop }, 400);

    isTop = true;
  }
خروجی منوی ساخته شده بالا به صورت زیر است:
منوی پویا و تعاملی جاوا اسکریپت بالا تجربه کاربری صفحات را بسیار بالا میبرد. با کلیک کردن روی نماد منو، اسلایدی یکپارچه با چهار گزینه ارائه میشود و کاربر میتواند بدون نیاز به پیمایش به بخشهای مختلفی از سایت سر بزند. پس از انتخاب آیتم منو، انتقالی روان مانند برنامههای تکصفحهای آغاز میشود. در مثال بالا نماد منو ثابت باقی میماند و به راحتی به بخشهای دیگر قابلیت پیمایش وجود دارد. انیمیشنهای منوی بالا هم در بسیار روان هستند و به طرز ماهرانهای یکپارچه شدهاند که تجربه کلی کاربر را بهبود میبخشند.
۶. منوی ناوبری
این مثال از ساخت منو با جاوا اسکریپت مربوط به نوعی منوی پیمایشی بوده که قطعه کد HTML آن به صورت زیر است:
<nav>
  <div class="logo">
      <h4>Navbar</h4>
  </div>
  <ul class="nav-links">
      <a href="#">Home</a>
      <a href="#">About</a>
      <a href="#">Contact</a>
     <a href="#">Blog</a>

  </ul>
  <div class="burger">
    <div class="line1"></div>
    <div class="line2"></div>
    <div class="line3"></div>
  </div>
</nav>
همچنین قطعه کد CSS این پروژه ساخت منو با Javascript به صورت زیر است:
body{
  margin: 0;
  padding: 0;
  font-family: sans-serif;
  overflow: hidden;
  background: #111;
}
div{
  box-sizing: border-box;
}
nav{
  background: #333;
  display: flex;
  justify-content:space-around;
  align-items: center;
  color: #fff;
}
.nav-links {
    display: flex;
    justify-content:space-around;
    width: 50%;
    text-transform: uppercase;
}
.nav-links a{
  display: block;
   text-transform: uppercase;
   text-decoration: none;
   color: #fff;
  border-bottom:2px solid transparent;
  transition:0.5s ease;
  transform: translateX(0%);
}
.nav-links a:hover{
  color:#38b8ff;
  letter-spacing: 5px;
}
.burger{
  display: none;
}
.burger div{
  width: 25px;
  height: 3px;
  background: #fff;
  margin: 5px;
  transition:all 0.5s ease;
}
@media only screen and (max-width: 760px){
   nav{
    justify-content: space-between;
    padding: 0 5vw;
  }
  .nav-links{
    position: absolute;
    right: 0;
    top:8vh;
    min-height:92vh;
    background: #333;
    display: flex;
    flex-direction: column;
    align-items: center;
    width: 50%;
    margin: 0;
    padding: 0;
    transform: translateX(100%);
    transition:All 0.5s ease-in;
  }
  .nav-links a{
    opacity: 0;

  }
  .burger{
    display: block;
  }

}
@media only screen and (max-width: 640px){
  nav{
    justify-content: space-between;
    padding: 0 5vw;
  }
}
.nav-active{
  transform: translateX(0);
}
@media only screen and (max-width: 460px){
  .nav-links{
    width: 100%;
    transition:All 0.5s ease;
  }
}
.nav-active{
  transform: translateX(0);
}
@keyframes navLinkFade{
  from{
    opacity: 0;
    transform: translateX(50px);
  }
  to{
    opacity: 1;
    transform: translateX(0);
  }
}
.toggle .line1{
   transform: rotate(-45deg) translate(-5px,6px );
}
.toggle .line2{
   opacity: 0;
}
.toggle .line3{
   transform: rotate(45deg) translate(-5px,-6px );
}
قطعه کد جاوا اسکریپت این مثال هم به صورت زیر است:
const navSlide = () => {
  const burger = document.querySelector(".burger");
  const nav = document.querySelector(".nav-links");
  const navLinks = document.querySelectorAll(".nav-links a");

  burger.addEventListener("click", () => {
    nav.classList.toggle("nav-active");

    navLinks.forEach((link, index) => {
      if (link.style.animation) {
        link.style.animation = "";
      } else {
        link.style.animation = `navLinkFade 0.5s ease forwards ${
          index / 7 + 0.5
        }s `;
      }
    });
    burger.classList.toggle("toggle");
  });
  //
};

navSlide();
خروجی پروژه منوی جاوا اسکریپتی بالا به صورت زیر است:
منوهای ناوبری معمولی و ساده، مانند مثال فوق برای ارائه تجربه کاربری روان بسیار مفید هستند ولی با این حال، جاوا اسکریپت تعامل و خلاقیت را به منوها اضافه کرده و در عین اینکه به آنها جذابیت خاصی میبخشد، آنها را به منوهای کاربریتری تبدیل میکند. در این زمینه، جاوا اسکریپت نقش اساسی در اعمال عملکردهای پویا و حذف استایلهای CSS ایفا خواهد کرد. این رویکرد منو را متحول کرده، خلاقیت را به پروژه میبخشد و اطمینان میدهد که منو با زیباییشناسی متمایزی در دید کاربران قرار میگیرد.
۷. شبیه سازی منوی تویتر
در این بخش از ساخت منو با جاوا اسکریپت به شبیه سازی منوی تویتر خواهیم پرداخت.
قطعه کد HTML انجام این کار به صورت زیر است:
<aside>
    <svg class="logo" viewBox="0 0 28 28">
        <path d="M27.5831 5.75986C26.6089 6.19153 25.5624 6.48319 24.4623 6.61503C25.5846 5.94303 26.4456 4.87669 26.8516 3.60736C25.8016 4.23036 24.6384 4.68303 23.4006 4.92569C22.4089 3.87103 20.9973 3.21069 19.4339 3.21069C16.4333 3.21069 13.9996 5.64436 13.9996 8.64736C13.9996 9.07203 14.0486 9.48503 14.1396 9.88403C9.62111 9.65653 5.61827 7.49236 2.93727 4.20469C2.47061 5.00969 2.20227 5.94303 2.20227 6.93703C2.20227 8.82236 3.16244 10.4872 4.61961 11.4614C3.72827 11.4322 2.89061 11.1884 2.15794 10.7812V10.8512C2.15794 13.4844 4.03044 15.6812 6.51777 16.1805C6.06044 16.3042 5.58094 16.3695 5.08627 16.3695C4.73627 16.3695 4.39444 16.3369 4.06311 16.2739C4.75494 18.4322 6.76161 20.0049 9.14044 20.0469C7.27961 21.5052 4.93577 22.3744 2.39011 22.3744C1.95144 22.3744 1.51861 22.3487 1.09277 22.2985C3.49844 23.842 6.35444 24.7404 9.42277 24.7404C19.4211 24.7404 24.8869 16.4594 24.8869 9.27736C24.8869 9.04403 24.8811 8.80836 24.8706 8.57503C25.9323 7.80736 26.8539 6.85186 27.5808 5.76336L27.5831 5.75986Z" />
    </svg>
    <nav>
        <button class="home">
            <div>
                <div class="icon">
                    <svg class="house" viewBox="0 0 24 24">
                        <g class="outline">
                            <path d="M22.601 7.49432L12.3602 1.97113C12.1341 1.84963 11.8635 1.84963 11.6375 1.97113L1.3987 7.49432C1.02974 7.69378 0.89188 8.15447 1.09157 8.52403C1.22841 8.77716 1.49094 8.92194 1.76057 8.92194C1.8822 8.92194 2.00688 8.89157 2.12142 8.83082L2.94754 8.38532L4.59875 20.0422C4.81567 21.2724 5.92459 22.13 7.29301 22.13H16.7016C18.072 22.13 19.1799 21.2714 19.4009 20.0169L21.0491 8.38329L21.8782 8.83082C22.2472 9.02623 22.7094 8.89157 22.9091 8.52302C23.1078 8.15548 22.9699 7.69479 22.601 7.49432V7.49432ZM17.8997 19.779C17.7913 20.3926 17.1871 20.6113 16.7036 20.6113H7.29503C6.80849 20.6113 6.20537 20.3926 6.10097 19.8033L4.37575 7.61582L11.9983 3.50304L19.6229 7.61379L17.8997 19.779V19.779Z" />
                            <path d="M8.21973 12.3C8.21973 14.384 9.91473 16.08 11.9997 16.08C14.0847 16.08 15.7797 14.384 15.7797 12.3C15.7797 10.216 14.0847 8.52002 11.9997 8.52002C9.91473 8.52002 8.21973 10.216 8.21973 12.3ZM14.2797 12.3C14.2797 13.558 13.2577 14.58 11.9997 14.58C10.7417 14.58 9.71973 13.558 9.71973 12.3C9.71973 11.042 10.7417 10.02 11.9997 10.02C13.2577 10.02 14.2797 11.042 14.2797 12.3Z" />
                        </g>
                        <path class="fill" d="M22.4824 7.448L12.4695 1.995C12.1753 1.835 11.8215 1.835 11.5282 1.995L1.52027 7.448C1.0387 7.712 0.859349 8.318 1.11896 8.804C1.29732 9.139 1.63918 9.329 1.99094 9.329C2.14948 9.329 2.31199 9.291 2.46161 9.209L3.18892 8.813L4.76442 20.063C4.97846 21.277 6.06248 22.125 7.40018 22.125H16.5976C17.9353 22.125 19.0193 21.277 19.2353 20.037L20.8088 8.812L21.5391 9.21C22.0197 9.473 22.6212 9.292 22.8808 8.806C23.1414 8.32 22.96 7.713 22.4805 7.451L22.4824 7.448ZM11.9989 15.533C10.2202 15.533 8.7785 14.078 8.7785 12.283C8.7785 10.488 10.2202 9.033 11.9989 9.033C13.7775 9.033 15.2192 10.488 15.2192 12.283C15.2192 14.078 13.7775 15.533 11.9989 15.533Z" />
                    </svg>
                    <svg class="feather left" viewBox="0 0 14 7">
                        <path d="M9.16667 1L13.5 3.94648C11.6429 6.89297 4.83333 6.89297 0.5 2.47324C3.59524 1 6.69048 2.47324 6.69048 2.47324L5.45238 1L9.16667 2.47324V1Z" />
                        <path d="M12 4.1C9 4.65 4.5 3.5 4.5 3.5" />
                    </svg>
                    <svg class="feather right" viewBox="0 0 14 7">
                        <path d="M4.83333 1L0.499999 3.94648C2.35714 6.89297 9.16667 6.89297 13.5 2.47324C10.4048 1 7.30952 2.47324 7.30952 2.47324L8.54762 1L4.83333 2.47324V1Z" />
                        <path d="M2 4.1C5 4.65 9.5 3.5 9.5 3.5" />
                    </svg>
                </div>
                Home
            </div>
        </button>
        <button class="explore">
            <div>
                <div class="icon">
                    <svg viewBox="0 0 24 24">
                        <path class="outline" d="M20.1215 3.68027C20.2477 3.62291 20.3775 3.75271 20.3202 3.87889L15.4927 14.4992C15.2926 14.9394 14.9398 15.2923 14.4996 15.4924L3.87927 20.3198C3.7531 20.3771 3.6233 20.2473 3.68065 20.1212L8.50808 9.50082C8.70818 9.0606 9.06099 8.70779 9.5012 8.50769L20.1215 3.68027Z" />
                        <path class="triangle" d="M14.6722 14.6718L9.32861 9.32822C9.08175 9.08137 9.15745 8.66395 9.47526 8.51949L20.1215 3.68027C20.2477 3.62291 20.3775 3.75271 20.3202 3.87889L15.4809 14.5252C15.3365 14.843 14.9191 14.9187 14.6722 14.6718Z" />
                    </svg>
                </div>
                Explore
            </div>
        </button>
        <button class="notifications active">
            <div>
                <div class="icon">
                    <svg viewBox="0 0 24 24">
                        <path class="ring" d="M15.75 17.5H8.24914C8.24914 17.5 8.00047 21.5 12 21.5C15.9995 21.5 15.75 17.5 15.75 17.5Z" />
                        <path class="bell" d="M21 17.5H3C5.07944 15.9703 5.25 11.5 5.5 8.5C5.50037 6.17481 8.67481 3 12 3C15.3252 3 18.5001 6.17481 18.5 8.5C18.75 11.5 18.9206 15.9703 21 17.5Z" />
                    </svg>
                </div>
                Notifications
            </div>
        </button>
        <button class="messages">
            <div>
                <div class="icon">
                    <div class="top">
                        <svg class="default" viewBox="0 0 24 13">
                            <path d="M11.1321 11.4858L11.133 11.4864C11.6584 11.8379 12.3416 11.8379 12.867 11.4864L22.417 5.09804L22.75 4.87529V4.47466V4.2579C22.75 2.60182 21.4067 1.25 19.75 1.25H4.25C2.59331 1.25 1.25 2.60182 1.25 4.2579V4.45559V4.85556L1.58214 5.0784L11.1321 11.4858Z" />
                        </svg>
                        <svg class="inner" viewBox="0 0 24 13">
                            <path d="M11.133 1.51361L11.1321 1.51417L1.58214 7.92157L1.25 8.14441V8.54438V11V11.75L2.00002 11.75H2.00007H2.00021H2.00076H2.00296H2.01167L2.04584 11.75L2.17721 11.75L2.66002 11.75L4.25 11.75H19.75L21.34 11.75L21.8228 11.75L21.9542 11.75L21.9883 11.75H21.997H21.9992H21.9998H21.9999H22L22.75 11.75V11V8.52531V8.12468L22.417 7.90193L12.867 1.51362C12.867 1.51361 12.867 1.5136 12.867 1.51359C12.3416 1.16213 11.6583 1.16214 11.133 1.51361Z" />
                            <rect x="2" y="11" width="20" height="1.5" />
                        </svg>
                    </div>
                    <svg viewBox="0 0 24 24">
                        <rect class="background" x="1.25" y="2.25" width="21.5" height="19.95" rx="3" />
                        <path class="front" d="M2.41843 6.8296L1.25 6.04411V7.45203V19.1891C1.25 20.8464 2.59174 22.202 4.25 22.202H19.75C21.4083 22.202 22.75 20.8464 22.75 19.1891V7.47013V6.06476L21.5825 6.84707L12.8425 12.7035L12.7821 12.744C12.5397 12.8907 12.2708 12.9628 12 12.9628C11.7065 12.9628 11.4157 12.8781 11.1584 12.7052L2.41843 6.8296Z" />
                    </svg>
                </div>
                Messages
            </div>
        </button>
        <button class="bookmark">
            <div>
                <div class="icon">
                    <svg viewBox="0 0 24 24">
                        <defs>
                            <clipPath id="default-clip">
                                <path d="M3.25 4.75C3.25 3.36929 4.36929 2.25 5.75 2.25H18.25C19.6307 2.25 20.75 3.36929 20.75 4.75V22.25H3.25V4.75Z" />
                            </clipPath>
                        </defs>
                        <g clip-path="url(#default-clip)">
                            <path class="background" d="M3.25 4.75C3.25 3.36929 4.36929 2.25 5.75 2.25H18.25C19.6307 2.25 20.75 3.36929 20.75 4.75V15.25H3.25V4.75Z" />
                            <path class="default" d="M4 4.7736C4 3.79407 4.79594 3 5.77778 3H18.2222C19.2041 3 20 3.79407 20 4.7736V20.3337C20 20.8741 19.3884 21.1889 18.947 20.8758L12 15.9473L5.05302 20.8758C4.61163 21.1889 4 20.8741 4 20.3337V4.7736Z" />
                        </g>
                        <path class="corner" d="M5.5 3L12 3.01L18.5 3V3.01H5.5V3Z" />
                    </svg>
                </div>
                Bookmarks
            </div>
        </button>
        <button class="lists">
            <div>
                <div class="icon">
                    <svg class="pencil" viewBox="0 0 8 22">
                        <path d="M1.34869 4.87898L6.65199 4.87898M6.65193 16.8942L4.00028 20.6065L1.34863 16.8942L1.34863 2.66652C1.34869 2.26878 1.50672 1.88734 1.78797 1.60609C2.06922 1.32484 2.45066 1.16681 2.84841 1.16675L5.15216 1.16675C5.54991 1.16681 5.93134 1.32484 6.21259 1.60609C6.49384 1.88734 6.65187 2.26878 6.65193 2.66652V16.8942Z" />
                    </svg>
                    <svg class="list" viewBox="0 0 24 24">
                        <rect x="2.5" y="2.5" width="19" height="19" rx="2.25" />
                        <path class="top" d="M7 8H17" />
                        <path class="middle" d="M7 12H17" />
                        <path class="bottom" d="M7 16H12" />
                    </svg>
                </div>
                Lists
            </div>
        </button>
        <button class="profile">
            <div>
                <div class="icon">
                    <svg viewBox="0 0 24 24">
                        <path class="head" d="M16 7C16 9.76142 15.7614 11 12 11C8.23858 11 8 9.76142 8 7C8 4.23858 9.23858 2.25 12 2.25C14.7614 2.25 16 4.23858 16 7Z" />
                        <path d="M11.9999 14C15.9613 14 18.962 16.5405 19.4799 19.5352C19.6485 20.5106 18.7676 21.25 17.7778 21.25H6.22181C5.23198 21.25 4.35113 20.5106 4.51978 19.5352C5.03763 16.5405 8.03845 14 11.9999 14Z" />
                    </svg>
                </div>
                Profile
            </div>
        </button>
    </nav>
</aside>

<a class="dribbble" href="https://dribbble.com/ai" target="_blank"><img src="https://cdn.dribbble.com/assets/dribbble-ball-mark-2bd45f09c2fb58dbbfb44766d5d1d07c5a12972d602ef8b32204d28fa3dda554.svg" alt=""></a>
<a class="twitter" target="_top" href="https://twitter.com/aaroniker_me"><svg xmlns="http://www.w3.org/2000/svg" width="72" height="72" viewBox="0 0 72 72"><path d="M67.812 16.141a26.246 26.246 0 0 1-7.519 2.06 13.134 13.134 0 0 0 5.756-7.244 26.127 26.127 0 0 1-8.313 3.176A13.075 13.075 0 0 0 48.182 10c-7.229 0-13.092 5.861-13.092 13.093 0 1.026.118 2.021.338 2.981-10.885-.548-20.528-5.757-26.987-13.679a13.048 13.048 0 0 0-1.771 6.581c0 4.542 2.312 8.551 5.824 10.898a13.048 13.048 0 0 1-5.93-1.638c-.002.055-.002.11-.002.162 0 6.345 4.513 11.638 10.504 12.84a13.177 13.177 0 0 1-3.449.457c-.846 0-1.667-.078-2.465-.231 1.667 5.2 6.499 8.986 12.23 9.09a26.276 26.276 0 0 1-16.26 5.606A26.21 26.21 0 0 1 4 55.976a37.036 37.036 0 0 0 20.067 5.882c24.083 0 37.251-19.949 37.251-37.249 0-.566-.014-1.134-.039-1.694a26.597 26.597 0 0 0 6.533-6.774z"></path></svg></a>
همچنین قطعه CSS آن به صورت زیر است:
:root {
  --c-sidebar: #000000;
  --c-default: #D9D9D9;
  --c-active: #1DA1F2;
  --c-hover: #081018;
}

aside {
  width: 280px;
  border-radius: 24px;
  padding: 40px;
  background: var(--c-sidebar);
}
aside .logo {
  display: block;
  width: 28px;
  height: 28px;
  fill: var(--logo-color, var(--c-default));
  margin-bottom: 36px;
}
aside nav {
  display: grid;
  grid-gap: 36px;
}
aside nav button {
  --c-color: var(--c-default);
  --c-background: var(--c-sidebar);
  --icon-fill: var(--c-background);
  -webkit-tap-highlight-color: transparent;
  -webkit-appearance: none;
  outline: none;
  background: none;
  border: none;
  padding: 0;
  margin: 0;
  font-family: -apple-system, BlinkMacSystemFont, "Segoe UI", Roboto, Helvetica, Arial, sans-serif;
  font-size: 19px;
  line-height: 24px;
  font-weight: bold;
  text-align: left;
  display: block;
  cursor: pointer;
  position: relative;
  color: var(--c-color);
}
aside nav button.active {
  --icon-fill: var(--c-active);
  --c-color: var(--c-active);
}
aside nav button .icon {
  margin-right: 16px;
  position: relative;
}
aside nav button .icon svg {
  display: block;
  width: 24px;
  height: 24px;
}
aside nav button > div {
  display: inline-flex;
  padding: 10px 20px 10px 12px;
  margin: -10px -20px -10px -12px;
  border-radius: 21px;
  background: var(--c-background);
}
aside nav button.home {
  --icon-fill-size: 0px;
  --icon-house-s: 1;
  --icon-outline-o: 1;
  --icon-outline-s: 1;
  --icon-feather-left-o: 1;
  --icon-feather-left-s: 0;
  --icon-feather-left-x: -7px;
  --icon-feather-left-y: -3.5px;
  --icon-feather-left-r: 0deg;
  --icon-feather-right-o: 1;
  --icon-feather-right-s: 0;
  --icon-feather-right-x: -7px;
  --icon-feather-right-y: -3.5px;
  --icon-feather-right-r: 0deg;
}
aside nav button.home.active {
  --icon-outline-o: 0;
  --icon-outline-s: .9;
  --icon-fill-size: 12px;
}
aside nav button.home .icon svg.house {
  fill: var(--c-color);
  transform: scale(var(--icon-house-s)) translateZ(0);
}
aside nav button.home .icon svg.house .fill {
  fill: var(--c-active);
  -webkit-clip-path: circle(var(--icon-fill-size) at 50% 50%);
          clip-path: circle(var(--icon-fill-size) at 50% 50%);
}
aside nav button.home .icon svg.house .outline {
  opacity: var(--icon-outline-o);
  transform: scale(var(--icon-outline-s)) translateZ(0);
  transform-origin: 12px 12px;
}
aside nav button.home .icon svg.feather {
  position: absolute;
  left: 50%;
  top: 12px;
  width: 14px;
  height: 7px;
  stroke: var(--c-background);
  fill: var(--c-active);
  stroke-width: 0.5px;
  stroke-linecap: round;
  stroke-linejoin: round;
  opacity: var(--icon-feather-left-o);
  transform: translate(var(--icon-feather-left-x), var(--icon-feather-left-y)) scale(var(--icon-feather-left-s)) rotate(var(--icon-feather-left-r)) translateZ(0);
}
aside nav button.home .icon svg.feather.right {
  opacity: var(--icon-feather-right-o);
  transform: translate(var(--icon-feather-right-x), var(--icon-feather-right-y)) scale(var(--icon-feather-right-s)) rotate(var(--icon-feather-right-r)) translateZ(0);
}
aside nav button.explore {
  --icon-r: 0deg;
  --icon-triangle-fill: var(--c-background);
  --icon-stroke: 1.5px;
}
aside nav button.explore.active {
  --icon-triangle-fill: var(--c-active);
  --icon-stroke: 2px;
}
aside nav button.explore .icon {
  transform: rotate(var(--icon-r));
}
aside nav button.explore .icon svg {
  stroke: currentColor;
  stroke-linejoin: round;
  stroke-linecap: round;
}
aside nav button.explore .icon svg .outline {
  stroke-width: var(--icon-stroke);
}
aside nav button.explore .icon svg .triangle {
  fill: var(--icon-triangle-fill);
  stroke-width: 1.5px;
}
aside nav button.notifications {
  --icon-r: 0deg;
  --icon-ring-x: 0px;
  --icon-bell-fill: var(--c-background);
  --icon-stroke: 1.5px;
}
aside nav button.notifications.active {
  --icon-bell-fill: var(--c-active);
  --icon-stroke: 2px;
}
aside nav button.notifications .icon svg {
  stroke: currentColor;
  stroke-linejoin: round;
  stroke-linecap: round;
  transform-origin: 50% 10%;
  transform: rotate(var(--icon-r)) translateZ(0);
}
aside nav button.notifications .icon svg .bell {
  stroke-width: 1.5px;
  fill: var(--icon-bell-fill);
}
aside nav button.notifications .icon svg .ring {
  stroke-width: var(--icon-stroke);
  transform: translateX(var(--icon-ring-x));
}
aside nav button.messages {
  --top-r: 0deg;
  --icon-stroke: var(--c-color);
}
aside nav button.messages.active {
  --icon-stroke: var(--c-sidebar);
}
aside nav button.messages .icon .top {
  position: absolute;
  top: 1px;
  left: 0;
  transform-style: preserve-3d;
  transform-origin: 50% 15%;
  transform: rotateX(var(--top-r));
}
aside nav button.messages .icon .top svg {
  height: 13px;
  -webkit-backface-visibility: hidden;
          backface-visibility: hidden;
  stroke-width: 1.5px;
  stroke-linecap: round;
  stroke-linejoin: round;
}
aside nav button.messages .icon .top svg.default {
  fill: var(--icon-fill);
  stroke: var(--icon-stroke);
}
aside nav button.messages .icon .top svg.inner {
  position: absolute;
  left: 0;
  top: 0;
  transform: rotateX(180deg);
  stroke: var(--c-sidebar);
}
aside nav button.messages .icon .top svg.inner rect {
  fill: #0168A7;
  stroke: none;
}
aside nav button.messages .icon .top svg.inner path {
  fill: #0168A7;
}
aside nav button.messages .icon svg {
  fill: var(--icon-fill);
  stroke: var(--icon-stroke);
  stroke-width: 1.5px;
}
aside nav button.messages .icon svg .background {
  fill: #0168A7;
}
aside nav button.bookmark {
  --icon-default-y: 0px;
  --icon-background-y: -17.5px;
  --icon-corner-fill: var(--c-background);
}
aside nav button.bookmark.active {
  --icon-corner-fill: var(--c-active);
}
aside nav button.bookmark .icon svg {
  stroke: currentColor;
  stroke-width: 1.5px;
  stroke-linejoin: round;
  stroke-linecap: round;
}
aside nav button.bookmark .icon svg .background {
  stroke: none;
  fill: currentColor;
  transform: translateY(var(--icon-background-y));
}
aside nav button.bookmark .icon svg .corner {
  fill: var(--icon-corner-fill);
}
aside nav button.bookmark .icon svg .default {
  transform: translateY(var(--icon-default-y));
  fill: var(--icon-fill);
}
aside nav button.lists {
  --icon-pencil-o: 0;
  --icon-pencil-x: 0;
  --icon-pencil-y: -.5px;
  --icon-pencil-r: 45deg;
  --icon-line: var(--c-color);
  --icon-line-top: 0px;
  --icon-line-middle: 0px;
  --icon-line-bottom: 0px;
}
aside nav button.lists.active {
  --icon-line: var(--c-background);
}
aside nav button.lists .icon svg {
  stroke-width: 1.5px;
  stroke-linejoin: round;
  stroke-linecap: round;
}
aside nav button.lists .icon svg.pencil {
  width: 8px;
  height: 22px;
  fill: var(--c-active);
  stroke: var(--c-sidebar);
  position: absolute;
  pointer-events: none;
  left: 2px;
  top: -12px;
  transform-origin: 50% 21px;
  opacity: var(--icon-pencil-o);
  transform: translate(var(--icon-pencil-x), var(--icon-pencil-y)) rotate(var(--icon-pencil-r));
}
aside nav button.lists .icon svg.list {
  stroke: currentColor;
}
aside nav button.lists .icon svg.list rect {
  fill: var(--icon-fill);
}
aside nav button.lists .icon svg.list path {
  stroke: var(--icon-line);
  stroke-dasharray: 10px;
  stroke-dashoffset: var(--icon-line-top);
}
aside nav button.lists .icon svg.list path.middle {
  stroke-dashoffset: var(--icon-line-middle);
}
aside nav button.lists .icon svg.list path.bottom {
  stroke-dasharray: 5px;
  stroke-dashoffset: var(--icon-line-bottom);
}
aside nav button.profile {
  --icon-r: 0deg;
  --icon-eye-r: 90deg;
  --icon-eye-r-s: 1;
}
aside nav button.profile .icon:before, aside nav button.profile .icon:after {
  content: "";
  position: absolute;
  left: 13px;
  top: 5px;
  width: 2px;
  height: 2px;
  border-radius: 1px;
  border-radius: 1px;
  background: var(--c-background);
  box-shadow: 4px 0 0 var(--c-background);
  transform: rotateX(var(--icon-eye-r));
}
aside nav button.profile .icon:before {
  left: 9px;
  transform: scaleX(var(--icon-eye-r-s)) rotateX(var(--icon-eye-r));
}
aside nav button.profile .icon svg {
  fill: var(--icon-fill);
  stroke: currentColor;
  stroke-width: 1.5px;
}
aside nav button.profile .icon svg .head {
  transform-origin: 12px 9px;
  transform: rotate(var(--icon-r));
}

html {
  box-sizing: border-box;
  -webkit-font-smoothing: antialiased;
}

* {
  box-sizing: inherit;
}
*:before, *:after {
  box-sizing: inherit;
}

body {
  min-height: 100vh;
  display: flex;
  justify-content: center;
  align-items: center;
  background: #15181C;
  padding: 40px;
}
body .dribbble {
  position: fixed;
  display: block;
  right: 20px;
  bottom: 20px;
}
body .dribbble img {
  display: block;
  height: 28px;
}
body .twitter {
  position: fixed;
  display: block;
  right: 64px;
  bottom: 14px;
}
body .twitter svg {
  width: 32px;
  height: 32px;
  fill: #1da1f2;
}
در نهایت کد CSS این منوی جذاب جاوا اسکریپتی به صورت زیر است:
const { to, set, registerPlugin } = gsap

registerPlugin(MorphSVGPlugin)

let getVar = key => getComputedStyle(document.documentElement).getPropertyValue(key)

const sidebar = document.querySelector('aside')

sidebar.querySelectorAll('button').forEach(button => {
    button.addEventListener('pointerenter', e => {
        to(button, {
            '--c-background': getVar('--c-hover'),
            '--c-color': getVar('--c-active'),
            duration: .15
        })
    })
    button.addEventListener('pointermove', e => {
        to(button, {
            '--c-background': getVar('--c-hover'),
            '--c-color': getVar('--c-active'),
            duration: .15
        })
    })
    button.addEventListener('pointerleave', e => {
        to(button, {
            '--c-background': getVar('--c-sidebar'),
            '--c-color': button.classList.contains('active') || sidebar.animating === button ? getVar('--c-active') : getVar('--c-default'),
            duration: .15
        })
    })
})

sidebar.querySelectorAll('.home').forEach(button => wrap(button, () => {
    to(button, {
        keyframes: [{
            '--icon-fill-size': '12px',
            '--icon-outline-s': .9,
            '--icon-outline-o': 0,
            '--icon-house-s': .85,
            duration: .2
        }, {
            '--icon-house-s': 1,
            duration: .65,
            ease: 'elastic.out(1, .65)',
            onStart() {
                to(button, {
                    keyframes: [{
                        '--icon-feather-right-s': 1,
                        duration: .1,
                        delay: .2,
                        onStart() {
                            to(button, {
                                keyframes: [{
                                    '--icon-feather-right-x': '0px',
                                    '--icon-feather-right-r': '-16deg',
                                    duration: .4
                                }, {
                                    '--icon-feather-right-x': '-9px',
                                    '--icon-feather-right-r': '16deg',
                                    duration: .4
                                }, {
                                    '--icon-feather-right-x': '3px',
                                    '--icon-feather-right-r': '0deg',
                                    duration: .4
                                }, {
                                    '--icon-feather-right-o': 0,
                                    duration: .15
                                }]
                            })
                        }
                    }, {
                        '--icon-feather-right-y': '10px',
                        duration: 1.2
                    }]
                })
                to(button, {
                    keyframes: [{
                        '--icon-feather-left-s': 1,
                        duration: .1,
                        onStart() {
                            to(button, {
                                keyframes: [{
                                    '--icon-feather-left-x': '-14px',
                                    '--icon-feather-left-r': '16deg',
                                    duration: .4
                                }, {
                                    '--icon-feather-left-x': '-10px',
                                    '--icon-feather-left-r': '-12deg',
                                    duration: .4
                                }, {
                                    '--icon-feather-left-x': '-14px',
                                    '--icon-feather-left-r': '0deg',
                                    duration: .4
                                }, {
                                    '--icon-feather-left-o': 0,
                                    duration: .15
                                }]
                            })
                        }
                    }, {
                        '--icon-feather-left-y': '10px',
                        duration: 1.2
                    }]
                })
            },
            onComplete() {
                button.classList.add('active')
                sidebar.animating = false
            }
        }]
    })
}))

sidebar.querySelectorAll('.explore').forEach(button => wrap(button, () => {
    to(button, {
        '--icon-triangle-fill': getVar('--c-active'),
        '--icon-stroke': '2px',
        duration: .15
    })
    to(button, {
        '--icon-r': '360deg',
        duration: 1.2,
        ease: 'elastic(1, .95)',
        clearProps: true,
        onComplete() {
            button.classList.add('active')
            sidebar.animating = false
        }
    })
}))

sidebar.querySelectorAll('.notifications').forEach(button => wrap(button, () => {
    to(button, {
        duration: 1,
        keyframes: [{
            '--icon-r': '-12deg',
            '--icon-ring-x': '-2.5px',
            '--icon-bell-fill': getVar('--c-active'),
            '--icon-stroke': '2px'
        }, {
            '--icon-r': '12deg',
            '--icon-ring-x': '4.5px'
        }, {
            '--icon-r': '-12deg',
            '--icon-ring-x': '-4.5px'
        }, {
            '--icon-r': '12deg',
            '--icon-ring-x': '4.5px'
        }, {
            '--icon-r': '0deg',
            '--icon-ring-x': '0px',
            onComplete() {
                button.classList.add('active')
                sidebar.animating = false
            }
        }]
    })
}))

sidebar.querySelectorAll('.messages').forEach(button => wrap(button, () => {
    to(button, {
        keyframes: [{
            '--icon-fill': getVar('--c-active'),
            '--icon-stroke': getVar('--c-sidebar'),
            duration: .15
        }, {
            '--top-r': '180deg',
            duration: .3
        }, {
            '--top-r': '0deg',
            duration: .25,
            onComplete() {
                button.classList.add('active')
                sidebar.animating = false
            }
        }]
    })
}))

sidebar.querySelectorAll('.bookmark').forEach(button => wrap(button, () => {
    to(button, {
        '--icon-default-y': '-20px',
        duration: .3
    })

    to(button, {
        keyframes: [{
            '--icon-background-y': '-5px',
            duration: .1,
            delay: .12
        }, {
            '--icon-background-y': '0px',
            duration: .16
        }]
    })

    to(button.querySelector('.corner'), {
        keyframes: [{
            morphSVG: 'M5.68047 3H11.9995H18.3186C20.7497 3 21.9299 9 19.2215 9H4.77786C2.06991 9 3.24972 3 5.68047 3Z',
            duration: .15
        }, {
            morphSVG: 'M4.36835 6C4.36835 6 5.71509 10.7143 12.0001 10.7143C18.2852 10.7143 19.6316 6 19.6316 6C23.6719 6 21.8766 12 19.1829 12H4.81702C2.12365 12 0.327912 6 4.36835 6Z',
            duration: .125
        }, {
            morphSVG: {
                shape: 'M4 20.3665C4.00001 20.8781 4.60713 21.1779 5.04898 20.8845L12 15.95L18.951 20.8845C19.3929 21.1779 20 20.8781 20 20.3664V15L4 14.9999V20.3665Z',
                shapeIndex: 6
            },
            duration: .6,
            ease: 'elastic.out(1, .75)',
            clearProps: true,
            onStart() {
                set(button, {
                    '--icon-corner-fill': getVar('--c-active'),
                    delay: .05
                })
            },
            onComplete() {
                button.classList.add('active')
                sidebar.animating = false
            }
        }]
    })
}))

sidebar.querySelectorAll('.lists').forEach(button => wrap(button, () => {
    to(button, {
        keyframes: [{
            '--icon-line-top': '10px',
            '--icon-line-middle': '10px',
            '--icon-line-bottom': '5px',
            duration: .15
        }, {
            '--icon-fill': getVar('--c-active'),
            '--icon-line': getVar('--c-sidebar'),
            '--icon-pencil-o': 1,
            duration: .15
        }, {
            '--icon-line-top': '0px',
            '--icon-pencil-x': '10px',
            duration: .15,
            onStart() {
                to(button, {
                    duration: .15,
                    keyframes: [{
                        '--icon-pencil-r': '40deg',
                    }, {
                        '--icon-pencil-r': '50deg',
                    }, {
                        '--icon-pencil-r': '45deg',
                    }]
                })
            }
        }, {
            '--icon-pencil-y': '4px',
            '--icon-pencil-x': '0px',
            duration: .1
        }, {
            '--icon-line-middle': '0px',
            '--icon-pencil-x': '10px',
            duration: .15,
            onStart() {
                to(button, {
                    duration: .15,
                    keyframes: [{
                        '--icon-pencil-r': '40deg',
                    }, {
                        '--icon-pencil-r': '50deg',
                    }, {
                        '--icon-pencil-r': '45deg',
                    }]
                })
            }
        }, {
            '--icon-pencil-y': '8px',
            '--icon-pencil-x': '0px',
            duration: .1
        }, {
            '--icon-pencil-x': '5px',
            '--icon-line-bottom': '0px',
            duration: .15
        }, {
            '--icon-pencil-o': 0,
            '--icon-pencil-x': '10px',
            duration: .1,
            clearProps: true,
            onComplete() {
                button.classList.add('active')
                sidebar.animating = false
            }
        }]
    })
}))

sidebar.querySelectorAll('.profile').forEach(button => wrap(button, () => {
    to(button, {
        keyframes: [{
            '--icon-fill': getVar('--c-active'),
            duration: .15
        }, {
            '--icon-r': '-20deg',
            duration: .15
        }, {
            '--icon-r': '20deg',
            duration: .15
        }, {
            '--icon-r': '0deg',
            duration: .2
        }, {
            duration: .15,
            clearProps: true,
            onComplete() {
                button.classList.add('active')
                sidebar.animating = false
            }
        }]
    })
}))

function wrap(button, callback) {
    button.addEventListener('click', e => {
        if(sidebar.animating || button.classList.contains('active')) {
            return;
        }
        sidebar.animating = button

        sidebar.querySelectorAll('button.active').forEach(active => {
            active.classList.remove('active')
            active.removeAttribute('style')
            if(active.querySelector('.corner')) {
                set(active.querySelector('.corner'), {
                    morphSVG: 'M5.5 3L12 3.01L18.5 3V3.01H5.5V3Z'
                })
            }
        })

        set(button, {
            '--c-color': getVar('--c-active')
        })

        return callback()

    })
}
خروجی قطعه کد بالا به صورت زیر است:
کاربرانی که دنبال جذابتر و خلاقانهتر کردن منوهای کناری هستند، میتوانند از مثال بالا ایده بگیرند.
۹. منوی ناوبری با پوشش تمام صفحه
این مثال از ساخت منو با جاوا اسلکریپت مربوط به منوی ناوبری با پوشش تمام صفحه خواهد بود که قطعه کد HTML آن به صورت زیر است:
<div id="nav-bg" class="btn"></div>
<div id="toggle-btn" class="btn">
  <span></span>
  <span></span>
  <span></span>
</div>

<div class="wrapper">
  <nav>
    <ul>
      <li><a class="link" href="#0">Projects</a></li>
      <li><a class="link" href="#0">About</a></li>
      <li><a class="link" href="#0">Contact</a></li>
    </ul>
  </nav>

  <div id="content">
    <h1>Floating circle navigation ~60fps animation</h1>
  </div>
</div>
قطعه کد CSS منوی تمام صفحه به صورت زیر است:
/* =======
IMPORTS
======= */
@import url('https://fonts.googleapis.com/css?family=Encode+Sans+Condensed:400,600');


/* =========
VARIABLES
========= */
:root {
  --offset-value: 30;
  --btn-size: 60;

  --green: #4ECA78;
}


/* =======
WRAPPER
======= */
.wrapper {
  font-family: 'Encode Sans Condensed', sans-serif;
  font-weight: 600;
  height: 100vh;
  width: 100%;
  position: relative;
  background: linear-gradient(to top right, #4ECA78, #D0DB68);
}


/* =====================
NAVIGATION BACKGROUND
===================== */
#nav-bg {
  transform-origin: center center;
  transition: transform .3s;
  transform: translate(var(--translate-x), var(--translate-y)) scale(var(--scale));
  will-change: transform;
  pointer-events: none;
}


/* ======
BUTTON
====== */
.btn {
  position: fixed;
  height: calc(var(--btn-size)*1px);
  width: calc(var(--btn-size)*1px);
  bottom: calc((var(--offset-value))*1px);
  left: calc(var(--offset-value)*1px);
  /*left: calc(50% - (var(--btn-size)/2*1px)); if you wish to center it */
  border-radius: 50%;
  background: #fafafa;
  cursor: pointer;
  margin: 0;
  padding: 0 15px;
  border: none;
  z-index: 100;
  user-select: none;
  -webkit-tap-highlight-color: rgba(0,0,0,0);
}

#toggle-btn {
  display: flex;
  flex-direction: column;
  justify-content: center;
  align-items: center;
  color: var(--green);
  /*box-shadow: 0 6px 12px rgba(0,0,0,.1);*/
  transition: transform .3s;
}

#toggle-btn span {
  position: relative;
  width: 100%;
}

#toggle-btn span {
  margin-top: -4px;
}
#toggle-btn span + span {
  margin-top: 8px;
}

#toggle-btn span:before,
#toggle-btn span:after {
  content: '';
  position: absolute;
  top: 0;
  background: currentColor;
  opacity: .8;
  height: 100%;
  width: 50%;
  height: 4px;
  transition: .25s cubic-bezier(.6,0,.3,1);
  transform-origin: center center;
}

#toggle-btn span:before {
  left: 0;
  border-radius: 3px 0 0 3px;
}

#toggle-btn span:after {
  right: 0;
  border-radius: 0 3px 3px 0;
}

#toggle-btn.shown span:nth-of-type(1):before {
  transform: translate3d(3px, 3.5px, 0) rotate(45deg);
}

#toggle-btn.shown span:nth-of-type(1):after {
  transform: translate3d(-3px, 3.5px, 0) rotate(-45deg);
}

#toggle-btn.shown span:nth-of-type(3):before {
  transform: translate3d(3px, -3.5px, 0) rotate(-45deg);
}

#toggle-btn.shown span:nth-of-type(3):after {
  transform: translate3d(-3px, -3.5px, 0) rotate(45deg);
}

#toggle-btn.shown span:nth-of-type(2):before,
#toggle-btn.shown span:nth-of-type(2):after {
  opacity: 0.0001;
}

#toggle-btn.shown span:nth-of-type(2):before {
  transform: translateX(-200%);
}

#toggle-btn.shown span:nth-of-type(2):after {
  transform: translateX(200%);
}

#toggle-btn.shown:before {
  transform: scale(.6);
  transition: .2s;
}

#toggle-btn:before {
  content: '';
  transition: .2s .2s;
  position: absolute;
  top: 3px;
  left: 0;
  width: 100%;
  height: 100%;
  background: rgba(0,0,0,.1);
  border-radius: inherit;
  filter: blur(5px);
  z-index: -2;
}
#toggle-btn:after {
  content: '';
  position: absolute;
  top: 0;
  left: 0;
  width: 100%;
  height: 100%;
  border-radius: inherit;
  background: #fafafa;
  z-index: -1;
}

/* ==========
NAVIGATION
========== */
nav {
  width: 100%;
  height: 100%;
  background: transparent;
  position: fixed;
  top: 0;
  left: 0;
  overflow: hidden;
  display: flex;
  z-index: 200;
  pointer-events: none;
}

nav ul {
  margin: auto;
  pointer-events: auto;
  text-align: center;
}

nav li {
  font-size: 30px;
  color: #212121;
  user-select: none;
  transform: translate(-20px,20px) scale(.9);
  transition: 0s;
  opacity: 0.0001;
  visibility: hidden;
  will-change: transform;
}

nav li + li {
  margin-top: 30px;
}

#toggle-btn.shown ~ .wrapper nav li {
  transform: none;
  opacity: 1;
  visibility: visible;
  transition: .35s cubic-bezier(.4,2.08,.55,1);
}

#toggle-btn.shown ~ .wrapper nav li:nth-child(1) {
  transition-delay: .15s;
}
#toggle-btn.shown ~ .wrapper nav li:nth-child(2) {
  transition-delay: .125s;
}
#toggle-btn.shown ~ .wrapper nav li:nth-child(3) {
  transition-delay: .1s;
}

/* ============
LINK EFFECT
============ */
.link {
  position: relative;
  touch-action: manipulation;
  -webkit-tap-highlight-color: rgba(0,0,0,0);
}

.link:before,
.link:after {
  position: absolute;
  content: '';
  height: 3px;
  width: 50%;
  background: #4ECA78;
  top: calc(50% + 2px);
  transition: transform .3s cubic-bezier(.5,.5,0,1);
}

.link:before {
  left: 0;
  transform: translateX(calc(-100% - 10px)) scaleX(0);
  transform-origin: left;
}

.link:after {
  right: 0;
  transform: translateX(calc(100% + 10px)) scaleX(0);
  transform-origin: right;
}

.link:hover:before {
  transform: translateX(calc(-100% - 10px)) scaleX(1);
  transform-origin: right;
}

.link:hover:after {
  transform: translateX(calc(100% + 10px)) scaleX(1);
  transform-origin: left;
}


/* =======
CONTENT
======= */
#content {
  display: flex;
  height: 100%;
}

#content h1 {
  font-size: calc(4vmin + 1em);
  text-align: center;
  margin: auto;
  color: #fff;
  text-shadow: 0 6px 18px rgba(0,0,0,.1);
}


/* Usual suspects */
* {
  box-sizing: border-box;
  margin: 0;
  padding: 0;
}

html, body {
  height: 100%;
}

a,
a:visited,
a:focus,
a:active,
a:link {
  text-decoration: none;
  outline: 0;
}

a {
  color: currentColor;
  transition: .2s ease-in-out;
}

ul {
  padding: 0;
  list-style: none;
}

img {
  vertical-align: middle;
  height: auto;
  width: 100%;
}
همچنین قطعه کد جاوا اسکریپت این منو به صورت زیر است:
const elem = document.querySelector('#nav-bg'),
toggleBtn = document.querySelector('#toggle-btn'),
elemH = elem.getBoundingClientRect().height,
elemW = elem.getBoundingClientRect().width;

let open = false;
let scale, offsetX, offsetY;

const calculateValues = () => {
  const w = window.innerWidth;
  const h = window.innerHeight;
  //const cssStyles = getComputedStyle(elem);
  //const offsetValue = Number(cssStyles.getPropertyValue('--offset-value'));
  const offsetValue = Number(getComputedStyle(elem).getPropertyValue('--offset-value'));

  //  Offsets to center the circle
  offsetX = w / 2 - elemW / 2 - offsetValue;
  offsetY = h / 2 - elemH / 2 - offsetValue;

  // Good old pythagoras
  const radius = Math.sqrt(h ** 2 + w ** 2);
  scale = radius / (elemW / 2) / 2 + .1; // Add '.1' to compensate for Safari sub pixel blur issue
  return scale;
};


const openMenu = () => {
  elem.style.setProperty("--translate-x", `${offsetX}px`);
  elem.style.setProperty("--translate-y", `-${offsetY}px`);
  elem.style.setProperty("--scale", scale);
};
const closeMenu = () => {
  elem.style.setProperty("--scale", 1);
  elem.style.setProperty("--translate-x", 0);
  elem.style.setProperty("--translate-y", 0);
};
const animateMenu = () => {
  open ? openMenu() : closeMenu();
};

const toggleMenu = () => {
  open = !open;
  animateMenu();
  toggleBtn.classList.toggle('shown');
};

const resizeHandler = () => {
  window.requestAnimationFrame(() => {
    calculateValues();
    animateMenu();
  });
};

calculateValues();

//toggleBtn.onclick = toggleMenu;
toggleBtn.addEventListener('click', toggleMenu, false);
window.addEventListener("resize", resizeHandler, false);
خروجی نهایی کدهای بالا به صورت زیر است:
انیمیشنهای «60 FPS» با کارایی بالا، منوی فوق را به منویی عمودی تمام صفحه تبدیل خواهند کرد و همچنین هنگام کلیک بر روری هر زیر منو، انیمیشنی متحرک با دو خط در چپ و راست خود دارند.
۹. منوی جاوا اسکریپت نواری
نمونه بعدی در ساخت منو با جاوا اسکریپت، منوی نواری با ظاهر شدن منوها از سمت راست آن بوده که قطعه کد HTML آن به صورت زیر است:
<header>
        <img class="activator" id="activator" src="//s.svgbox.net/hero-outline.svg?fill=fff#menu-alt-1" alt="">
        <nav>
            <ul>
                <li><a href="#"><img src="//s.svgbox.net/hero-outline.svg?fill=805ad5#bell"></a></li>
                <li><a href="#"><img src="//s.svgbox.net/hero-outline.svg?fill=805ad5#beaker"></a></li>
                <li><a href="#"><img src="//s.svgbox.net/hero-outline.svg?fill=805ad5#chat"></a></li>
                <li><a href="#"><img src="//s.svgbox.net/hero-outline.svg?fill=805ad5#cloud-download"></a></li>
                <li><a href="#"><img src="//s.svgbox.net/hero-outline.svg?fill=805ad5#cog"></a></li>
            </ul>
        </nav>
    </header>
قطعه کد این منوی جاوا اسکریپت هم به صورت زیر است:
body {
  margin: 0;
  height: 100vh;
  background: #242831;
  color: white;
  display: grid;
  place-content: center;
}

header {
  display: flex;
}
header .activator {
  padding: 1em;
  border-radius: 100%;
  cursor: pointer;
}
header .activator:hover {
  background: #1e2129;
}

img {
  width: 100%;
  max-width: 45px;
}

ul {
  list-style-type: none;
  margin: 0;
  padding: 0;
}

nav {
  background: #292e38;
  border-radius: 0 5em 5em 0;
  padding: 0.5em;
  clip-path: ellipse(50% 50% at -50% 50%);
}
nav ul {
  display: flex;
}
nav ul li a {
  display: block;
  padding: 0.5em;
  margin: 0 0.5em;
  border-radius: 50%;
}
nav ul li a:hover {
  background: #323844;
}
nav ul li a img {
  opacity: 0;
  transform: translateX(-10px);
}
کدهای جاوا اسکریپت منوی مد نظر به صورت زیر است:
 var card = document.getElementById('activator');
        var tl = gsap.timeline({defaults: {ease: "power2.inOut"}})

        var toggle = false;

        tl.to('.activator', {
            background: '#805ad5',
            'borderRadius': '5em 0 0 5em'
        });
        tl.to('nav', {
            'clipPath': 'ellipse(100% 100% at 50% 50%)'
        }, "-=.5")
        tl.to('nav img', {
            opacity: 1,
            transform: 'translateX(0)',
            stagger: .05
        }, "-=.5")
        tl.pause();

        card.addEventListener('click', () => {
            toggle = !toggle;
            if (toggle ? tl.play() : tl.reverse());
        })
حال خروجی کدهای بالا برای ساخت منو با جاوا اسکریپت به صورت تصویر زیر است:
منوی بالا به خصوص برای استفاده در دستگاههای موبایل بسیار منوی جذابی خواهد شد و کاربر به راحتی میتواند استایل آن را مطابق استایل و سبک طراحی خود تغییر دهد.
۱۰. منوی پیمایش متحرک برای دستگاه های موبایل
مثال آخر از ساخت منو با جاوا اسکریپت در این مطلب از مجله فرادرس، منوی پیمایش متحرک برای دستگاههای موبایل خواهد بود که قطعه کد HTML آن به صورت زیر است:
<!-- https://dribbble.com/shots/6251784-Navigation-Menu-Animation  -->
<nav>
  <div class="link-background"></div>
  <ul>
    <li>
      <a class="active">
                <svg>
                    <use xlink:href="#home">
                </svg>
                <span class="link-text">Home</span>
            </a>
    </li>
    <li>
      <a>
                <svg>
                    <use xlink:href="#inbox">
                </svg>
                <span class="link-text">Inbox</span>
            </a>
    </li>
    <li>
      <a>
                <svg>
                    <use xlink:href="#profile">
                </svg>
                <span class="link-text">Profile</span>
            </a>
    </li>
  </ul>
</nav>
<svg style=display:none;>
    <symbol version="1.1" id="home" xmlns="http://www.w3.org/2000/svg" xmlns:xlink="http://www.w3.org/1999/xlink"
    viewBox="0 0 50 50">
    <path fill="none" stroke="" stroke-width="2" stroke-linecap="round" stroke-miterlimit="10" d="M31,44.738v-8.52
    c0-1.505-0.69-2.929-1.877-3.87l0,0c-1.826-1.448-4.421-1.448-6.247,0l0,0C21.69,33.288,21,34.712,21,36.218v3.565"/>
    <line fill="none" stroke="" stroke-width="2" stroke-linecap="round" stroke-miterlimit="10" x1="15" y1="20.223" x2="29" y2="20.223"/>
    <path fill="none" stroke="" stroke-width="2" stroke-linecap="round" stroke-miterlimit="10" d="M8,19.232
    L24.681,5.466c0.758-0.632,1.869-0.62,2.612,0.03l15.03,13.144C42.754,19.016,43,19.557,43,20.126v22.892
    C43,44.113,42.105,45,41,45h-8.6H31H10c-1.105,0-2-0.887-2-1.982V28.151c0-1.095,0.895-1.982,2-1.982h7"/>
    </symbol>
    <symbol version="1.1" id="inbox" xmlns="http://www.w3.org/2000/svg" xmlns:xlink="http://www.w3.org/1999/xlink"
  viewBox="0 0 50 50">
  <path fill="none" stroke-width="2" stroke-miterlimit="10" d="M45.5,39.5h-40c-1.657,0-3-1.343-3-3V23.55
    c0-0.028,0.022-0.05,0.05-0.05h13.555l0.665,1.989c0.952,3.563,4.29,6.106,8.139,6.115c0.061,0,0.122,0,0.183,0
    c3.849-0.009,7.187-2.552,8.139-6.115l0.665-1.989H47.45c0.028,0,0.05,0.022,0.05,0.05V37.5C47.5,38.605,46.605,39.5,45.5,39.5z"/>
  <path fill="none" stroke-width="2" stroke-miterlimit="10" d="M47.5,23.5l-7.109-11.664
    c-0.556-0.835-1.493-1.336-2.496-1.336H12.106c-1.003,0-1.94,0.501-2.496,1.336L2.5,23.5"/>
    </symbol>
    <symbol version="1.1" id="profile" xmlns="http://www.w3.org/2000/svg" xmlns:xlink="http://www.w3.org/1999/xlink"
  viewBox="0 0 50 50">
  <line fill="none" stroke-width="2" stroke-linecap="round" stroke-miterlimit="10" x1="18.5" y1="37" x2="28.5" y2="37"/>
  <line fill="none" stroke-width="2" stroke-linecap="round" stroke-miterlimit="10" x1="14.5" y1="42" x2="21.5" y2="42"/>
  <path fill="none" stroke-width="2" stroke-linecap="round" stroke-miterlimit="10" d="M35.857,27.299
    C32.753,25.216,29.019,24,25,24C14.735,24,6.323,31.931,5.557,42"/>
  <path fill="none" stroke-width="2" stroke-linecap="round" stroke-miterlimit="10" d="M35.857,29.299"/>
  <path fill="none" stroke-width="2" stroke-linecap="round" stroke-miterlimit="10" d="M39.665,30.648"/>
  <path fill="none" stroke-width="2" stroke-linecap="round" stroke-miterlimit="10" d="M44.443,42
    c-0.269-3.539-1.483-6.815-3.391-9.574"/>
  <circle fill="none" stroke="" stroke-width="2" stroke-linecap="round" stroke-miterlimit="10" cx="25.5" cy="17" r="9"/>
    </symbol>
</svg>
قطعه کد CSS این مثال به صورت زیر است:
@import url("https://fonts.googleapis.com/css?family=Roboto:400,400i,700");
body,
html {
  height: 100%;
}
body {
  margin: 0;
  display: flex;
  align-items: center;
  justify-content: center;
  background: #e9ecff;
  font-family: "Roboto";
}
nav {
  position: relative;
}
ul {
  list-style-type: none;
  padding: 0;
  background: #432fbf;
  border-bottom-left-radius: 40px;
  border-bottom-right-radius: 40px;
  box-shadow: 2px 10px 20px rgba(67, 47, 191, 0.5);
}
li {
  display: inline-block;
  margin: 40px 20px;
}
li:first-child {
  margin-left: 30px;
}
li:last-child {
  margin-right: 30px;
}
a {
  cursor: pointer;
  display: flex;
  align-items: center;
  padding: 10px 25px;
}
svg {
  stroke: #9386ea;
  width: 44px;
  height: 44px;
  transform: translateX(35px);
  transition: 0.4s ease all;
}
a.active {
  color: white;
}
a.active svg {
  stroke: white;
  transform: translateX(0px);
}
.link-text {
  color: white;
  margin-left: 16px;
  opacity: 0;
  transition: 0.3s ease all;
  user-select: none;
  height: 42px;
  display: flex;
  align-items: center;
  z-index: 1;
}
a.active .link-text {
  opacity: 1;
  transition-delay: 0.1s;
}
.link-background {
  position: absolute;
  left: 30px;
  top: 53px;
  background: #5e4ecb;
  border-radius: 18px;
  width: 153px;
  height: 70px;
  z-index: 0;
  transition: 0.4s cubic-bezier(0.7, 0, 0.38, 0.86) all;
}
همچنین قطعه کد جاوا اسکریپت این مثال به صورت زیر است:
let links = document.querySelectorAll('a');
let background = document.querySelector('.link-background');


const clickHandler = el => {
  links.forEach(link => {
    link.classList.remove('active');
  });
  el.classList.add('active');
};
links.forEach((link, index) => {
  link.addEventListener('click', e => {
    e.preventDefault();
    // Update background position
    background.style.transform = `translateX(${128.25 * index}%)`;
    clickHandler(e.currentTarget);

  });
});
خروجی کدهای بالا منوی جذاب زیر است:
سخن پایانی
منوهای جاوا اسکریپت قابلیت بسیار کاربردی و جذابی هستند که کارهای پیمایش وبسایت یا وب اپلیکیشن را بسیار ساده کرده و به کاربران نهایی این امکان را میدهند که به راحتی به بخشهای مختلف سایت سر بکشند. این منوها در کنار اینکه جذابیت خاصی به پروژههای توسعه وب میبخشند، بسیار کاربردی و کاربرپسند نیز هستند به گونهای که در حال حاضر کمتر وبسایتی پیدا میشود که از منوهای ناوبری استفاده نکند.
در مطلب آموزش ساخت منو با جاوا اسکریپت از مجله فرادرس در کنار آموزش ساخت منویی جذاب و کاربردی به صورت قدم به قدم، ۱۰ تا منوی جذاب و کاربردی نیز همراه قطعه کدهای آن ها ارائه شد. کاربران میتوانند از نمونه منوهای بالا ایده گرفته و یا حتی از خود آنها در پروژههای توسعه وب استفاده کنند.